Posted: January 8th, 2015 | Author:admin | Filed under:Software, Tutorial, Wi-Fi | Comments Off on Internet of things – a problem and solution with dynamic DNS
I just found out that Netgear routers support Dynamic DNS. Not bad for a $29 router, like my WNR 1000.
Let me explain what that is cool:
If you want to access an ‘internet thing’ in your house, you need either:
A proxy service. OR you need to set it up yourself, with
Dynamic DNS + Port Forwarding + IP Reservation. ALL available on your router.
Proxy services offer a lot of features and convenience, but will always control your data and you will always be beholden a 3rd party. So I’m not so keen on those options. It is a tiny,tiny bit more work to set up, but once you have it running, you can effectively make each little ‘internet thing’ accessible (like … 20 minutes work, or less).
Setting it all up.
The WildFire is perfect for this application. So let’s say you have a WildFire running in your home controlling something, and want to access it from your cell phone. Log into your home router and do three things:
Reserve the IP address of the device. That is, grab the MAC address, and tell your router “whenever this MAC address connects, give it this particular IP address”. Your router will have a ‘IP reservation’ screen, probably under Advanced > LAN settings or similar,
Forward a port on your router. So when a person comes from the outside, and accesses a particular port (like port 80), send them to a particular IP address – the one you just set up. Now you can contact your WildFire from anywhere in the world, by IP address.
Use Dynamic DNS to give your WildFire a nice name, instead of an IP address. With Netgear you can sign up directly inside the Admin console. This will give you an address like myhouse.mynetgear.com. You have limited choices in the ‘mynetgear’ part, but that is fine.
Voila! You can access your device from anywhere, using your cell phone, by entering in the URL Not bad for 20 minutes work.
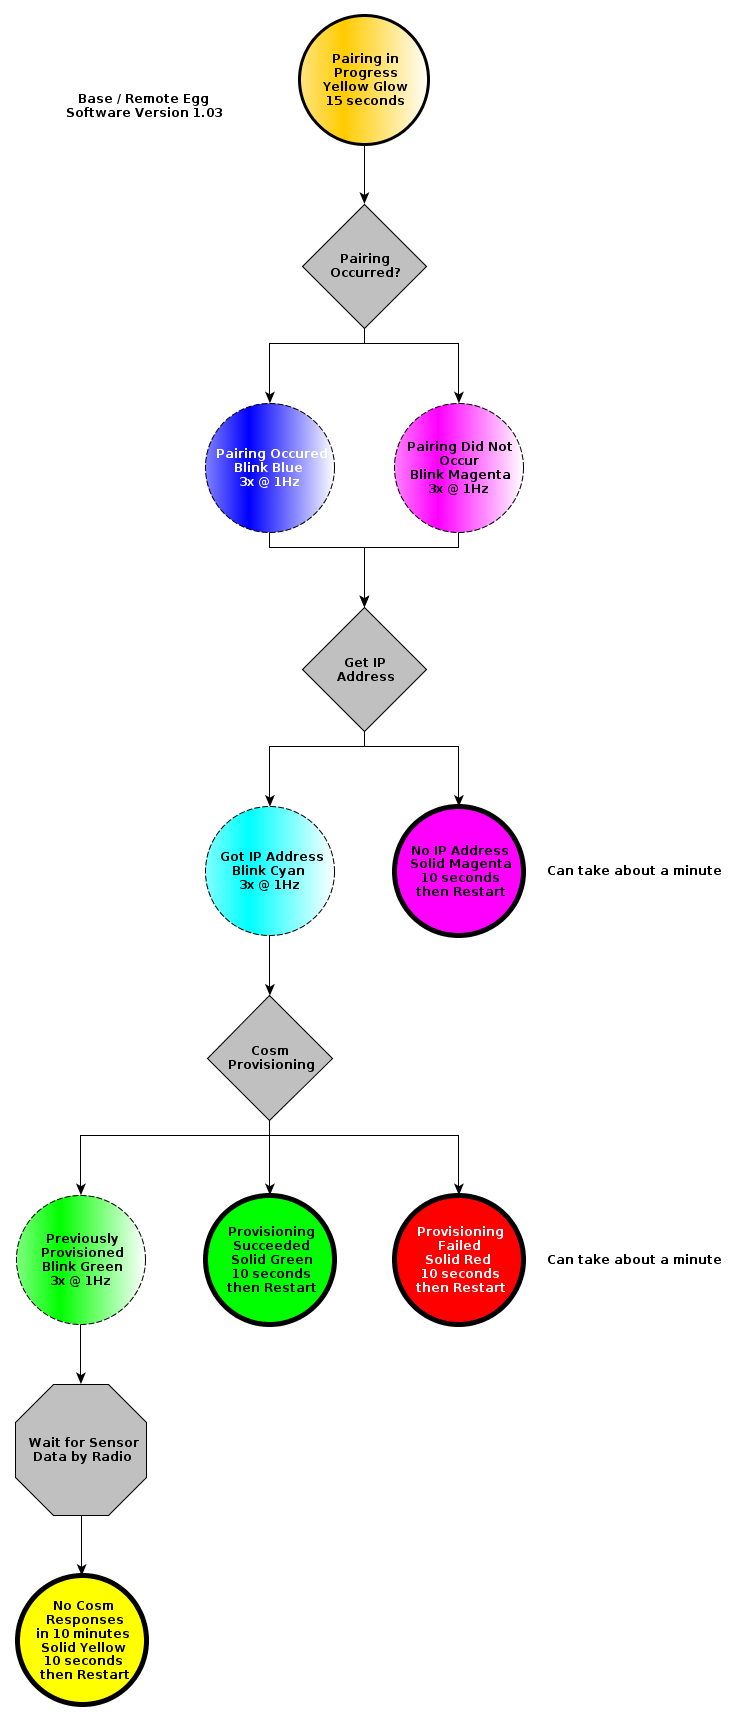
Over the weekend I worked on making the color expressions of the Air Quality Egg more… well, expressive. The update is on Git-Hub so feel free to update your software (howto videos) for the Remote and Base units. This is the 1.03 version of both baselines (version number gets printed to the serial console).
As the Eggs have been reaching their destinations, feedback from users indicated that the setup process had some significant holes in diagnostic feedback. The most important of these was that the outcome of the pairing interval was invisible to the end user; the only way you knew that pairing succeeded was that the system started working a couple minutes later. If the system didn’t start working, you were left scratching your head and trying again. So I added an acknowledgement to the pairing behavior, and now there’s clear feedback about the outcome of the pairing interval: after the yellow pulses that signify pairing in progress, three magenta blinks indicate “pairing was not acknowledged” and three cyan (light blue) blinks indicate “pairing was acknowledged.”
The second feedback notable feedback confusion was related to Cosm provisioning. The previous behavior was to indicate solid green when provisioning succeeded, but *only the first time* after that you would never see green again. So now, if provisioning has previously succeeded, you get three green blinks.
In summary, the colors the Egg expresses now come in three “flavors”:
Pulsing colors are used to indicate normal activity and progress (I know some people find this annoying, but I’m erring on the side of more feedback)
Blinking colors are used to signify status
Solid colors are used to indicate conditions that result in a restart
Blinking/Solid green, blue, and cyan are used as “positive” indicators
Blinking/Solid red and magenta are used as “negative” indicators
The following flowchart describes the feedback behavior of the 1.03 baseline.
Reprogram your Eggs (we’ll post a video and some instructions to help in the next few days).
How to choose an option: We may discover more bugs in the future. Option 2 empowers you to reprogram your Eggs whenever additional bugs are found, or enhancements are published. If you are not comfortable doing that, choose Option 1.
The Longer Story
I have some unfortunate news. Provisioning with Cosm seems to have stopped working somewhere along the way. The good news is I’ve already got a software fix. The not-so-good news is that it’s pretty likely we’ve already shipped your Egg.
As I’ve described in other posts, when your Egg is first plugged into a network it reaches out to Cosm to declare its existence. In exchange for this declaration, (and by virtue of the fact that we’ve pre-registered your serial number) Cosm issues your Egg an API Key and Feed ID. The Nanode should extract these bits of information, remember them, and thereafter use that information to post information to the Cosm website under the prescribed Feed ID. This was all working, but something has changed. The software I wrote for the Base Egg wasn’t prepared for the change. I think the Cosm responses used to be fragmented into two or more packets and that is no longer the case. In a nutshell, Cosm is getting the message and issuing the activation data to the Egg, but the Egg is ignoring that response, and just keeps re-attempting activation.
The technical detail is in Provision.ino in the AQEBase sketch:
static void provisioningCallback (byte status, word off, word len) {
…
if (status == 1){ //we’re getting the body —
… all the parsing of the response happens here …
and  status is being returned as 0 from the EtherCard library so the response is not being parsed. The fix is stupidly easy: remove the guard and everything works as expected. Honestly, I can’t remember why I put the guard in there in the first place. It was probably cut-and-paste from an EtherCard example.
GREAT, SO NOW WHAT!?
The simple truth is that this will probably not be the last bug we find that needs to be patched. I wish that weren’t true and that I were a perfect programmer, but I’m not. We (Wicked Device) also can’t afford the shipping costs of offering to personally reprogram everyone’s Egg every time a bug is found and needs to be patched. Fortunately, the whole project is open source and I can push patches up to Git-Hub and announce when bugs are found to the Google Group and blog. I can also post instructions / videos showing you how to update your own units. The problem that remains is that you need a “special” cable to program the Egg units, commonly called an FTDI cable. In retrospect, I wish we had just included one with the Eggs, but we were already up against a wall with cost.
Here is a solution I think is reasonable: we will send you a suitable programming cable from our store (linked above), or  buy an FTDI cable (or equivalent) from the supplier of your choice. This will allow you to reprogram the Egg units anytime you need to. This cable will also be a necessary ingredient for performing sensor calibration in the future.
Please accept my apologies. We appreciate your understanding as we continue to do our best to support the Air Quality Egg community! This has certainly been a learning experience so far.
Posted: August 9th, 2012 | Author:admin | Filed under:Nanode, Software | Comments Off on Nanode video by Mark VandeWettering
One of our customers, Mark VandeWettering, has a pretty nifty video of the Nanode acting as a webserver to change LED strip colors. The blog post is here.
I want to spend a couple paragraphs writing about Networks and debugging code running on the Nanode (or Arduino Ethernet for fthat matter) that uses them. I realize this blog entry is not for everyone, and probably will get it’s share of <yawns>, but it’s super important knowledge for when everything doesn’t go your way on networks. With Arduino sketches, you are kind of stuck with Serial.print(...) and LEDs to get insight into what’s going on, but that’s really pretty ineffective when it comes to network interactions. Honestly, for most users the network stuff better “just work” or they are going to be turned off pretty quickly. I , however, am not one to throw in the towel when the networking stuff doesn’t work, and hopefully I can shed some light onto what can be a shadowy space in the programming / debugging landscape. There’s no substitute for using the right tool for the job.
So given that printing to the console can only get you so far with network code debugging, what is a perplexed programmer to do? Well your best choice at that point is to look at what’s going on “on the wire.” In most realms, that means busting out an oscilloscope or logic analyzer, but in the networking world, we have much better / more appropriate tools available for the job. There’s an excellent, indispensible, and free(!) program called WireShark that you can download for just about any platform. WireShark allows you to capture all the traffic on any Ethernet interface (e.g. your network card) and dig into the details of the packets, which, I might add, it conveniently parses out for you for all but the most obscure protocols. You can also set up your capture with filters on pretty much anything you can imagine related to the packet contents (MAC addresses, IP addresses, whatever). And get this, you can check a box in the capture that will have your network card capture all the traffic that it sees (not just the stuff destined for it).
Here’s the rub, though. Unfortunately (or fortunately depending on your perspective) most networks today are equiped with “smart switches,” which eliminate collision domains, which means your network card only ever “sees” those packets which are legitimately destined for it (or broadcast / multicast). So while Wireshark is an awesome tool, it alone can probably not help you debug what’s going wrong with your Nanode software. To unleash the debugging power of WireShark on your Nanode, you’re going to need some “dummer” hardware, namely an Ethernet Hub. Good luck finding one at a retail store – I had to resort to the E-bay for mine, and got an 8-port hub for about $10.
A Hub is very similar to a switch in that it gives you more places to plug into your network. The big difference with a hub is that it internally connects all the ethernet wires together (well sort of) so that all the devices connected to the hub get to “see” each others packets, unfettered by the intelligent filtering of a switch. So if you plug in the ethernet cable from your computer into the hub, plug in the ethernet cable from your Nanode into the hub, connect your hub to your router, and run WireShark, both your computer and your Nanode should be able to get “on the internet.” More importantly, your computer running WireShark will be able to “snoop” on the internet traffic going to and from your Nanode! Now we’re in business. Often times you can look at what the network traffic is supposed to look like using your computer (by filtering on traffic coming to/from your computer’s MAC address for example) and all the fancy-pants network tools that come with it (especially if you’re on a linux box), then compare that to what happens when your Nanode participates in an analogous network exchange (by filtering on the Nanode’s MAC address for example).
Armed with these tools (and some practice, and some reading about protocols), you’ll be able to get to the bottom of your network problems in no time!