Posted: April 22nd, 2013 | Author: admin | Filed under: AQE | Tags: Air Quality Egg, AQE, aqe sensor | Comments Off on Air Quality Egg: Shield Firmware Update
Based on my research findings (described in my last post), I spent some time digging into the Egg Shield hardware and firmware and I made some significant updates in hopes of improving results. I’m currently running an overnight experiment of the latest firmware, which I pushed out on GitHub (also for the Ozone and VOC add-ons). I also put load scripts out there to help ease the update process. I wanted to give an update on what I found and what I did.
Constant Heater Voltage
There was an observable random “spiking” phenomenon associated with the dynamic heater voltage control algorithm. I still don’t know the root cause of that, but I know that if I take that algorithm out, the associated phenomenon goes away, so the current version of the firmware sets the voltage at start-up and leaves it alone. I determined the settings for each heater experimentally by trying a setting, measuring H+ and H- and calculating the heater power, until I hit the datasheet targets.
Range Selection Algorithm / Fixed Point Math Rewrite
I was concerned about the frequent reports of apparent overflow conditions occurring. I looked into how to make better use of our range selection capability and rewrote it to select the range that yields results that are closest to the mid-range voltage. I believe this algorithm should provide more stable / continuous results than the original algorithm. In particular, I expect that it will be more immune to overflow conditions.
NO2 Hardware Bug – Workaround
In re-writing the Range Selection Algorithm, I was astonished to find an undiscovered hardware bug in the Egg Shield. I kept trying different settings on the range selection divider for NO2, but no matter what I did, two of the range settings always yielded the same analog-to-digital conversion result. I dug in and traced it back to the schematic (after hours of assuming I must be doing something wrong in software).
It turns out there is a node named “/NO2_R2_SEL” and a separate node named “/R2_SEL.” Those were meant to be the same node, but the tools don’t know that, so they never got connected in the layout. The effect is that it’s impossible to select a low-side resistance of R1 + R2 = 24.2 kΩ for NO2. <face-palm!> The firmware didn’t know about that bug either, so its model of the world didn’t agree with reality when it chose that range. This inconsistency was almost certainly also contributing to the instability in the NO2 readings we’ve been seeing. Anyway, the firmware agrees with the hardware now. I think it will be less accurate than it could have been were it not for the hardware bug, but I think this will be much better than what we had going on.
What To Do Next
I’ll follow up with a post tomorrow night with my overnight results. If you’re ambitious and know what you’re doing, the software and binaries for the firmware updates above is already out on GitHub and you can go ahead and re-flash your Egg Shield to hopefully start getting better results right away. As a reminder, Joe Saavedra also made a nice tutorial on how you can use an Arduino (or a Nanode) to reprogram a Sensor Shield. I plan to do a video to demonstrate that process as well in the next couple weeks. As always, if you’re uncomfortable reprogramming the hardware for yourself and  you are willing to pay for the round-trip shipping, I am willing to personally reprogram your hardware at no additional cost.
Posted: February 4th, 2013 | Author: admin | Filed under: AQE, Software | Tags: Air Quality Egg, AQE, software | Comments Off on AQE: Enhanced RGB User Feedback
Over the weekend I worked on making the color expressions of the Air Quality Egg more… well, expressive. The update is on Git-Hub so feel free to update your software (howto videos) for the Remote and Base units. This is the 1.03 version of both baselines (version number gets printed to the serial console).
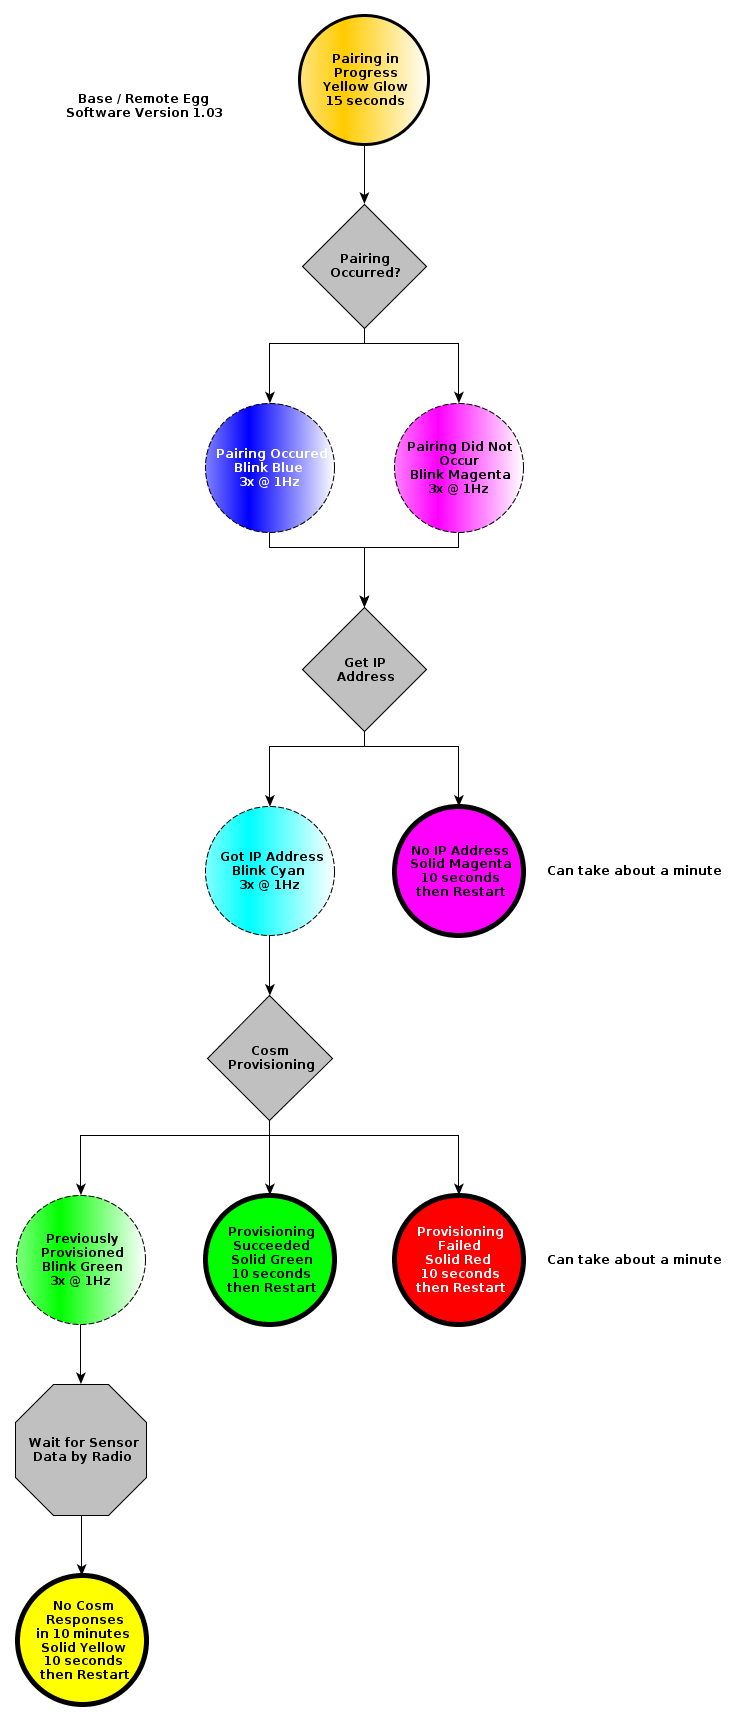
As the Eggs have been reaching their destinations, feedback from users indicated that the setup process had some significant holes in diagnostic feedback. The most important of these was that the outcome of the pairing interval was invisible to the end user; the only way you knew that pairing succeeded was that the system started working a couple minutes later. If the system didn’t start working, you were left scratching your head and trying again. So I added an acknowledgement to the pairing behavior, and now there’s clear feedback about the outcome of the pairing interval: after the yellow pulses that signify pairing in progress, three magenta blinks indicate “pairing was not acknowledged” and three cyan (light blue) blinks indicate “pairing was acknowledged.”
The second feedback notable feedback confusion was related to Cosm provisioning. The previous behavior was to indicate solid green when provisioning succeeded, but *only the first time* after that you would never see green again. So now, if provisioning has previously succeeded, you get three green blinks.
In summary, the colors the Egg expresses now come in three “flavors”:
- Pulsing colors are used to indicate normal activity and progress (I know some people find this annoying, but I’m erring on the side of more feedback)
- Blinking colors are used to signify status
- Solid colors are used to indicate conditions that result in a restart
- Blinking/Solid green, blue, and cyan are used as “positive” indicators
- Blinking/Solid red and magenta are used as “negative” indicators
The following flowchart describes the feedback behavior of the 1.03 baseline.
Posted: January 26th, 2013 | Author: admin | Filed under: AQE, Repair, Software | Comments Off on AQE Bugs
The Short Story
There’s a bug with Cosm activation. If your Egg is not publishing data, here’s what you have to do, without getting into the details:
Option 1: Send us back your Air Quality Egg, along with prepaid return postage. We will re-program it for you.
Option 2: Update the software yourself. Steps:
- Get an “FTDI cable.” You can get one from us ($22 or $13), or your local reseller (or if you have an Arduino laying around…)
- Download the latest software from Git-Hub.
- Reprogram your Eggs (we’ll post a video and some instructions to help in the next few days).
How to choose an option: We may discover more bugs in the future. Option 2 empowers you to reprogram your Eggs whenever additional bugs are found, or enhancements are published. If you are not comfortable doing that, choose Option 1.
The Longer Story
I have some unfortunate news. Provisioning with Cosm seems to have stopped working somewhere along the way. The good news is I’ve already got a software fix. The not-so-good news is that it’s pretty likely we’ve already shipped your Egg.
As I’ve described in other posts, when your Egg is first plugged into a network it reaches out to Cosm to declare its existence. In exchange for this declaration, (and by virtue of the fact that we’ve pre-registered your serial number) Cosm issues your Egg an API Key and Feed ID. The Nanode should extract these bits of information, remember them, and thereafter use that information to post information to the Cosm website under the prescribed Feed ID. This was all working, but something has changed. The software I wrote for the Base Egg wasn’t prepared for the change. I think the Cosm responses used to be fragmented into two or more packets and that is no longer the case. In a nutshell, Cosm is getting the message and issuing the activation data to the Egg, but the Egg is ignoring that response, and just keeps re-attempting activation.
The technical detail is in Provision.ino in the AQEBase sketch:
static void provisioningCallback (byte status, word off, word len) {
…
if (status == 1){ //we’re getting the body —
… all the parsing of the response happens here …
and  status is being returned as 0 from the EtherCard library so the response is not being parsed. The fix is stupidly easy: remove the guard and everything works as expected. Honestly, I can’t remember why I put the guard in there in the first place. It was probably cut-and-paste from an EtherCard example.
GREAT, SO NOW WHAT!?
The simple truth is that this will probably not be the last bug we find that needs to be patched. I wish that weren’t true and that I were a perfect programmer, but I’m not. We (Wicked Device) also can’t afford the shipping costs of offering to personally reprogram everyone’s Egg every time a bug is found and needs to be patched. Fortunately, the whole project is open source and I can push patches up to Git-Hub and announce when bugs are found to the Google Group and blog. I can also post instructions / videos showing you how to update your own units. The problem that remains is that you need a “special” cable to program the Egg units, commonly called an FTDI cable. In retrospect, I wish we had just included one with the Eggs, but we were already up against a wall with cost.
Here is a solution I think is reasonable: we will send you a suitable programming cable from our store (linked above), or  buy an FTDI cable (or equivalent) from the supplier of your choice. This will allow you to reprogram the Egg units anytime you need to. This cable will also be a necessary ingredient for performing sensor calibration in the future.
Please accept my apologies. We appreciate your understanding as we continue to do our best to support the Air Quality Egg community! This has certainly been a learning experience so far.
Posted: January 21st, 2013 | Author: admin | Filed under: AQE | Comments Off on Mark Gibbs from Network World reviews the Air Quality Egg
 On January 17th, Mark Gibbs from Network World has published a review of the Air Quality Egg. He made some great comments which we will be taking to heart (Better documentation, move the sticker off the box, both spot on). The review also had some comments we are quite proud of:
“And that’s it, the AQE system is a great example of plug n’ play done right.”
“… a huge thumbs up for delivering an ambitious solution to citizen-driven environmental monitoring.”
Posted: January 9th, 2013 | Author: admin | Filed under: AQE | Comments Off on Egg voted top 20 Kickstarters of 2012
The Air Quality Egg was voted one of the top 20 Kickstarters of 2012!
http://www.kickstarter.com/year/2012?utm_campaign=Jan082013&utm_medium=email&utm_source=newsletter#air_quality_egg
Posted: December 13th, 2012 | Author: admin | Filed under: AQE, NewProduct | Comments Off on Egg Dust Sensor boards
We did the first tun of dust sensor breakout boards yesterday, so I snapped a pic of some with my phone camera: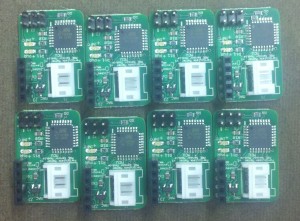 The white connector is for the bus cable which runs to the main Egg sensor shield. The dust sensor itself (not pictured) screws into the top side of the shell.
Posted: December 6th, 2012 | Author: Vic | Filed under: AQE, Nanode | Tags: Air Quality Egg, AQE, aqe sensor | Comments Off on Air Quality Egg Sensor Shield – HowTo
This one is for everyone who only got an Air Quality Egg Egg  Sensor Shield. I wanted to write it as a way of aggregating a bunch of information that is scattered across the interwebs presently. I’m also going to write it from the perspective of a Nanode as the host processor as that’s what I’m most familiar with and that’s what I wrote some code for. Here is the basic idea of how to get up and running quickly.
- Send us your MAC address (e.g. 00:04:a1:3c:11:22) from your Nanode to support AT wickeddevice DOT com (you know the drill). We need to register your device with Cosm to fold it into the Air Quality Egg network. If you run the sketch below and look at the serial data output, the MAC address gets printed out for your convenience.
- We will respond by email and let you know you’re hooked up on the back end.
- Download the software from Git Hub.
- Copy everything from the libraries folder to your arduino libraries folder.
- Load the AQEBaseSensor sketch onto your Nanode.
- Go to http://airqualityegg.com and type in your MAC address .
- Enjoy your data!
For people who got full-up Air Quality Eggs, we will have basically done everything up to step 6 for you (with different sketches). I’m completely swamped through December at least… it would be totally amazing if someone from the Air Quality Egg community could port this sketch to Arduino/Wiznet… I think it should be a relatively straightforward exercise.
Posted: November 17th, 2012 | Author: Vic | Filed under: AQE, Uncategorized | Tags: AQE, sensor | Comments Off on Air Quality Egg: Setting R0 Values
Some people have been trying to update their fielded Egg Shields and running into trouble with really small values being reported (like 0). One reason this could happen is a mistake made here at the “factory” during programming. The sensors rely on a value stored per sensor called R0 – which is to say the nominal resistance of the sensor in ambient conditions. During device programming, we should have set these value to something reasonable. We set R0 for the NO2 sensors to 2200 (ohms) and R0 for the CO sensors to 750000 (ohms).
To do this procedure, you’ll need an FTDI cable or equivalent to program the device using the Arduino IDE. If you download the EggBus library from Git-Hub, it comes with a few useful examples. If you start by loading up the PollEggBus example (File => Examples => EggBus => PollEggBus”), it will show you, for each sensor it finds on the bus, a bunch of useful information. You’re going to want to look closely at what it says for “R0:” Â – and if it’s a “really big value” (like 4294967295, which turns out to be 0xffffffff to the binary initiated)Â we’ll have to run a quick sketch to get things back on track. Load up the PollEggBus_WriteTest example (File => Examples => EggBus => PollEggBus_WriteTest) and run it. After it runs you should see NO2’s R0 value is 2200 and CO’s R0 value is 750000 as advertised.
You can change these values to whatever you want actually, and I’m going to write up a derivative example that lets you perform a targeted calibration procedure in the near future.
Load back your Air Quality Egg sketch back onto your Nanode after you run this program (for standalone eggs this is probably the AQEBaseSensor sketch, and for Egg pairs it’s probable the AQERemote sketch). Hopefully this helps you out if it seems like your Egg is always outputting zero.
Posted: November 17th, 2012 | Author: admin | Filed under: AQE | Comments Off on Air Quality Egg Unboxing
In our last update, we talked about ordering the first article enclosures. Well, they have arrived! Here is an unboxing of the Air Quality Egg.
First, let’s take a look at the outside packaging. This is how it will arrive on your doorstep:
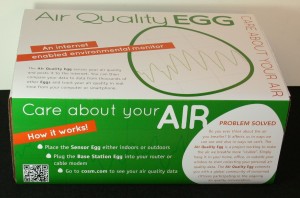 [As always, click on images to biggify.]
As we were working on the packaging, we needed to know it could arrive in one piece. So we made a unit yesterday and played soccer with it around the shop, to test if it can survive the world’s mail services. (It did great).
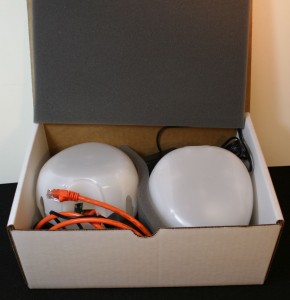
The base station and remote (sensor) eggs, nestled in the foam! There is also an Ethernet cable and two power supplies. It will also ship with an instruction leaflet, which is not written yet. Let’s unpack:
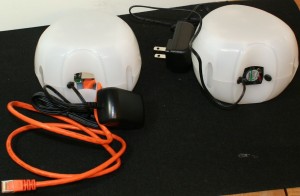 Here we can see the backs/undersides of the units. The base station has the network cable and power. The remote station has the network cable and fan. The fan will ensure a consistent airflow. Also, the base station will have a square hole – Albert, our erstwhile designer, will be uploading a 3D print to insert to close it. This is a function of saving costs by using the same enclosure for both the inside and outside units.
If you are just wanting to use them, you would now plug them in and head over to cosm.com. But let’s see what is inside:
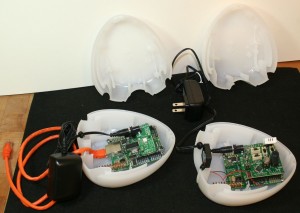 Here we can see the actual sensors on the remote station (Right) and the multicolor LED board on the base station (Left). The base station shield is designed for maximum hackability, and includes board space for a pushbutton switch and a capacitive sensing wire. You can use these to make the base responsive.
The enclosures are held together without screws, so it is easy to just twist-and-pull-and-pop them apart. It’s all in the wrist.
That completes the unboxing. We will have more to show you soon – things are at a very exciting point.
Posted: October 31st, 2012 | Author: admin | Filed under: AQE | Comments Off on Air Quality Egg enclosures update
If you have been following airqualityegg@googlegroups.com you probably know that enclosures are the gating factor in us getting the units out the door. Here is an update on the timeline:
I placed the enclosures order on Monday. It takes 3 weeks for the manufacturer to make the mold and send us a sample. This is used to check the mold is correct before we go and spend a bunch of money on something that does not work. Once that is done, we will be able to place the production order, which takes another 3 weeks. Then we’ll be able to ship units.
Again, I apologize for this delay. We’ll get them out the door as soon as we can.


