Posted: October 30th, 2013 | Author: Ken Rother | Filed under: Nanode, Tutorial | Tags: nanode, Wireless, Xively | Comments Off on Nanode Gateway/Remote Tutorial 3
Was it really that cold last night Do you think the pipes may have frozen?
Note: This is part of series of tutorials on the Nanode
Using Tutorial 2 we have a mechanism for collecting temperature data from one or more remote locations and seeing those results on a computer connected via USB to our Nanode Gateway. Handy but not that useful for looking at historical data and trends. Not to mention who wants to tie up a computer just to see the information from our Gateway. Wouldn’t it be cool to have our data web accessible? It’s time to show the world what we have been up to and publish our temperature data to a central web accessible repository.
In addition to the Nanode Gateway, Nanode Remote and FTDI cable, a few other parts are required to complete this project. A complete kit including a Nanode Gateway and NanodeRemote is available from Wicked Device,  we will also need a cable to connect our Nanode Gateway to an network hub.
In this tutorial we will be modifying our Nanode Gateway code to publish the information collected from the Nanode Remote sensors to Xively (the Nanode Remote code requires no change). Before digging into the code let’s create an account on Xively. Head over to xively.com and follow these steps
Setting up a Xively.com account
Step 1 – Click getting started (top right)

Xively.com home screen (click to enlarge)
Step 2 – Click “Sign Up for a Free Develop Account” (part way down the page on the left)

Xively getting started screen (click to enlarge)
Step 3 – Fill in required fields to create an account on Xively

Xively sign up screen (click to enlarge)
Step 4 – You should receive an activation email to the account you filled in during sign up. Click the activation link in the email. If clicking that link does not go directly to the “Welcome to Xively” page, go back to xively.com and click login link. Enter login info

Xively login screen (click to enlarge)
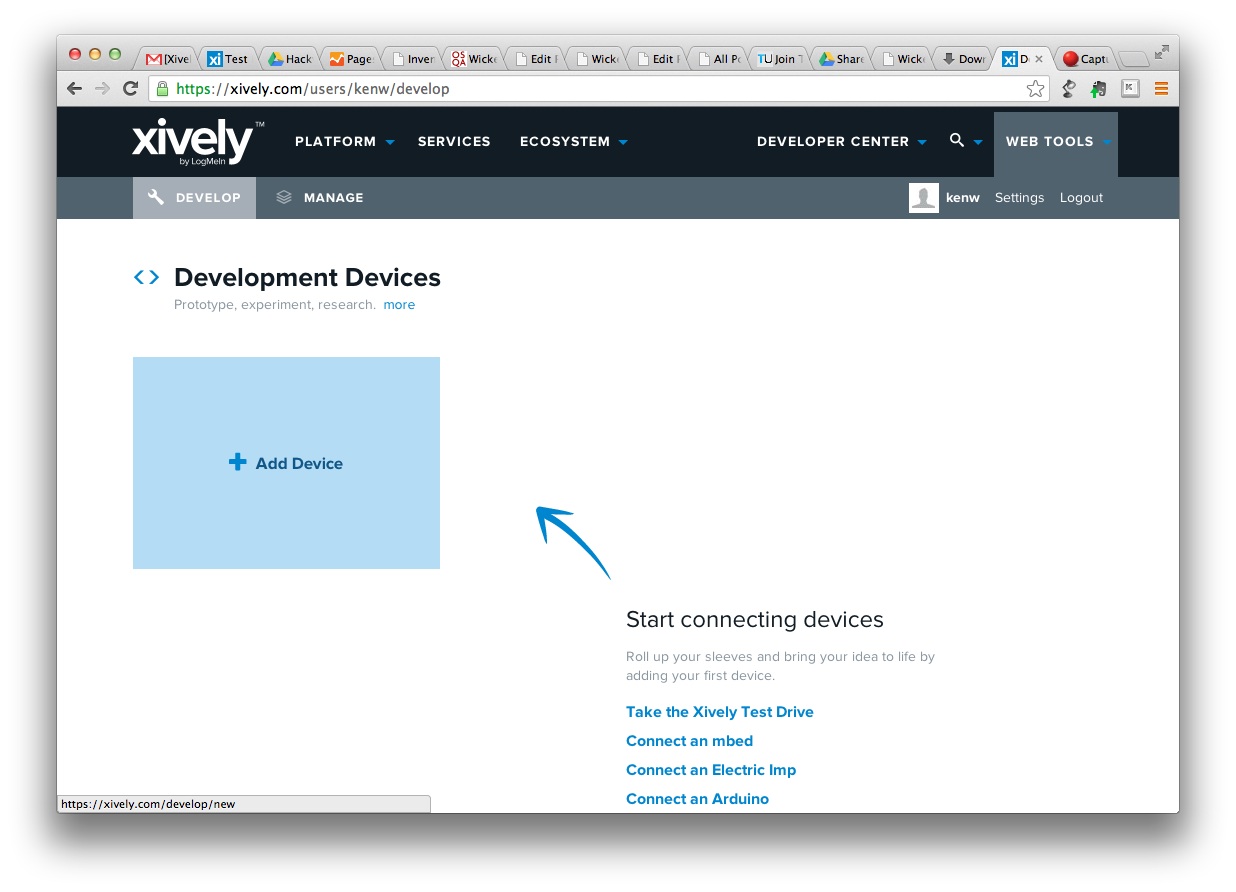
Step 5 – On the “Welcome to Xively” page click “Web Tools” (top right) and select Develop

Xively 1st login (click to enlarge)
Step 6 – Click “Add Device”

Xively add device (click to enlarge)
Step 7 – Fill in Device Name and Device Description and select either private or public. Click “Add Device”
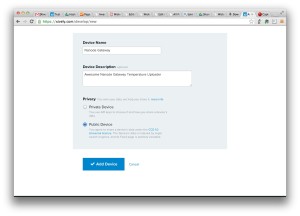
Xively add device info (click to enlarge)
Step 8 – We will need the information on the last page for our Nanode Gateway sketch
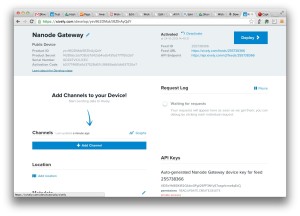
Xively device info (click to enlarge)
In order to keep things as simple as possible this tutorial contains a sketch that communicates with only one Nanode Remote. Additionally for those unfamiliar with data structures and arrays this sketch tries to simplify the code as much as possible. In he next tutorial we will explore a more full featured version of this sketch, one that has the hooks required to communicate with multiple Nanode Remotes as well code that will be easier to extend in  future tutorials.
Before loading this code into our Nanode Gateway don’t forget to connect your Nanode to your network. Now we can load the following code into our Arduino IDE.
// Based on the poller code and  Simple demo for feeding some
// random data to Pachube. From <jc@wippler.nl>
// 2011-11-23 <jc@wippler.nl> http://opensource.org/licenses/mit-license.php
//
//
#include <EtherCard.h>
#include <JeeLib.h>

#define LOOP_DELAY 10000 // Milliseconds, time to wait between polling remote node

/*
  RF12 Communications
*/
#define RF12_GROUPID 212        // All nodes must be a member of the same group
#define RF12_NODEID_GATEWAY  1 // Each node within a group must have a unique ID
#define RF12_NODEID_REMOTE   2
#define RF12_WAIT 15 //ms Time to wait for Remote node to respond to a data request

// structure of data returned by each Remote node. Gateway and Remote must use same structure
typedef struct {
  byte node;
  long time;
  float temperature;
} Payload;

// Information required to connect to Xively account
// change these settings to match your own setup
char website[] PROGMEM = "api.xively.com";
#define FEED    "399733688"   // Put Your Feed ID here
#define APIKEY  "Ilxcnw2fQK8xyUX4S1VXQAbykGjOKPWY7xStWP0ghbSAMIt3" // Put Your APIKEY here

// Network interface setup info
// ethernet interface mac address, must be unique on your LAN
byte mymac[] = { 0x74,0x69,0x69,0x2D,0x30,0x31 };
byte Ethernet::buffer[700];
Stash stash;

void sendXively(char *channel, int value){
   // by using a separate stash,
   // we can determine the size of the generated message ahead of time
   byte sd = stash.create();

   stash.print(channel);
   stash.print(",");
   stash.println(value);
   stash.save();

   // generate the header with payload - note that the stash size is used,
   // and that a "stash descriptor" is passed in as argument using "$H"
   Stash::prepare(PSTR("PUT http://$F/v2/feeds/$F.csv HTTP/1.0" "\r\n"
                    "Host: $F" "\r\n"
                    "X-PachubeApiKey: $F" "\r\n"
                    "Content-Length: $D" "\r\n"
                    "\r\n"
                    "$H"),
            website, PSTR(FEED), website, PSTR(APIKEY), stash.size(), sd);

   // send the packet - this also releases all stash buffers once done
   ether.tcpSend();
}

void setup () {
//Setup serial port for Arduino IDE monitor function (USB)
  Serial.begin(57600);
  Serial.println("\nGateway");

//Setup RFM12B Radio for Gateway/Remote Communications
  rf12_initialize(RF12_NODEID_GATEWAY, RF12_433MHZ, RF12_GROUPID);

//Setup Network connection
  if (ether.begin(sizeof Ethernet::buffer, mymac) == 0)
    Serial.println( "Failed to access Ethernet controller");

  if (!ether.dhcpSetup())
    Serial.println("DHCP failed");

  ether.printIp("IP:  ", ether.myip);
  ether.printIp("GW:  ", ether.gwip);
  ether.printIp("DNS: ", ether.dnsip);

  if (!ether.dnsLookup(website))
    Serial.println("DNS failed");

  ether.printIp("SRV: ", ether.hisip);

}

MilliTimer timer;
uint32_t looptimer = 0;

void loop () {
    ether.packetLoop(ether.packetReceive());

    if (millis() > looptimer) {
      looptimer = millis() + LOOP_DELAY;

      // send an empty packet to Nanode Remote
      rf12_sendNow(RF12_HDR_ACK | RF12_HDR_DST |RF12_NODEID_REMOTE, 0, 0);

      // wait up to RF12_WAIT milliseconds for a reply from remote node
      timer.set(RF12_WAIT);
      while (!timer.poll())
        if (rf12_recvDone() && rf12_crc == 0 && rf12_len == sizeof (Payload)) {
          // got a good ACK packet, print out its contents

          // Data from RFM12B returns in rf12_data
          const Payload* p = (const Payload*) rf12_data;

          Serial.print("Remote Temperature - ");
          Serial.println(p->temperature);

          sendXively("Shed-Temperature",p->temperature);
          break;
        }
    }
}
Since there are several changes to the previous version of the gateway code used in tutorial 2 let’s run through the complete sketch.
Line 6: This include, EtherCard.h, supports the functionality for the network connection.
Line 16: This must match the ID of the Nanode remote, remember each Nanode in a local network must belong to the same group and each Nanode within that group must have a unique ID.
Lines 28-30: This is the information required to upload data to Xively. The information for lines 29 and 30 can be found on the last screen (step 8) of the Xively setup.
Lines 34-36: These lines are what we need to connect to the network. Line 34 specifies a MAC address for the Nanode Gateway network connection. It is important that the MAC address of every device on your local network be unique, if you only have one Nanode Gateway on your network it is probably ok to just leave the address already in the sketch.
Lines 38-60: This is where are the work happens. At its core the sendXively function takes two parameters, a string specifying what Xively channel we wish to send data to and an actual value. In our case we will be sending the string “Shed-Temperature” and the temperature we get the our Nanode Remote. For now I am going to skip the details of this function. Studying it should give you a fairly good understanding of what’s going on, we will dig deeper into the sendXively function in a subsequent tutorial.
Lines 71-84: Are the setup lines for the network connection, the code in lines 77-79 prints the IP address assigned to Nanode Gateway, the IP address of the local network gateway (usually your network modem) and lastly the IP address of the DNS server. Line 81 looks up the IP address of the Xively server. Details on how to use a static IP address instead of a DHCP served address to follow shortly
Lines 92-113: When using the network connection the main loop looks a little different compared to the sketch from tutorial 2. It is import the code on line 92 run each time through the main loop and there is no significant delay between executions of line 92. So instead of using a delay() call in the main loop, on line 94 we check the current time in milliseconds to see if enough time has passed and it is time to poll the remote node. If yes we update the next time to poll the remote node (looptimer), the rest of the remote polling code is the same as tutorial 2 except for the addition of Line 103  where the call the sendXively function with the name of the channel and value. If line 94 is false, the remote is node is not polled, the loop code returns  to the top and executes line 92 once again.
Here is what my Xively feed looks (link) like
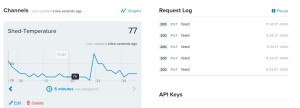
Xively Screen Grab (click to enlarge)
Ok, That’s it, we should now be able to send and record data in Xively
Next: storing data from multiple Nanode Remotes to Xively
@ken_rother
Posted: October 18th, 2013 | Author: Ken Rother | Filed under: Nanode, Tutorial | Tags: nanode, Wireless | Comments Off on Nanode Gateway/Remote Tutorial 2
Hey it’s freezing in the basement, what’s the temperature upstairs?
Note: This is part of series of tutorials on the Nanode
Ok, so now that we can get the temperature from one remote sensor back to the central gateway how about collecting temperature readings from multiple sensors? This is a scenario where the Nanode Gateway/Remote architecture shines. Only one Nanode Gateway is required to communicate with multiple Nanode Remotes and additional Nanode Remotes are quite inexpensive.
Let’s dig into the code changes required to extend tutorial 1 and enable support of multiple sensors.
Gateway changes  (The code is shown twice, once with inline commentary and a second time in a clean version that you can put cut and paste into an Arduino IDE Window).
/// Based on the polleer code from <jc@wippler.nl>
// 2011-11-23 <jc@wippler.nl> http://opensource.org/licenses/mit-license.php
//
//
#include <JeeLib.h>

#define LOOP_DELAY 5000 // Milliseconds
/*
  RF12 Communications
*/
#define RF12_GROUPID 212    // all nodes must be a member of the same group
                          // to communicate with each other
#define RF12_NODEID_GATEWAY  1      // Each node within a group must have a unique ID
The first change swaps the original #define that defined a single Nanode remote ID with an int array, listOfNodes. This array holds the node ID for each remote Nanode. In our case we have two remote Nanodes with IDs 2 and 5. For information on Nanode/Arduino arrays check out the Arduino reference.
// an array of remote node addresses
#define TOTAL_NODES 2
int listOfNodes[TOTAL_NODES] = {2,5};

MilliTimer timer;

typedef struct {
  byte node;
  long time;
  float temp;
} Payload;

void setup () {
  Serial.begin(57600);
  Serial.println("Gateway");

  rf12_initialize(RF12_NODEID_GATEWAY, RF12_433MHZ, RF12_GROUPID);
}
The second change creates a global variable used to index the array of remote node ids. This variable is used in the main loop.
int remoteNodeIndex=0;

void loop () {
Next, the original code in the main loop is wrapped in a for loop. So instead of polling a single remote Nanode, each time through the sketch loop we poll each Nanode that is listed in listOfNodes. We also added two print statements so we can see on the serial monitor which remote nodes are being polled.
  for(remoteNodeIndex = 0; remoteNodeIndex < TOTAL_NODES; remoteNodeIndex++){
    Serial.print("Poll Node = ");
    Serial.println(listOfNodes[remoteNodeIndex]);

   // send an empty packet to Nanode Remote
   rf12_sendNow(RF12_HDR_ACK | RF12_HDR_DST | listOfNodes[remoteNodeIndex], 0, 0);
   // wait up to 10 milliseconds for a reply
   timer.set(10);
   while (!timer.poll())
     if (rf12_recvDone() && rf12_crc == 0 && rf12_len == sizeof (Payload)) {
       // got a good ACK packet, print out its contents

       // Data from RFM12B returns in rf12_data
       const Payload* p = (const Payload*) rf12_data;
       Serial.print("Node: ");
       Serial.print((word) p->node);
       Serial.print(": ");
       Serial.println(p->temp);
       break;
     }
   }
One last change is another Serial.println once the for loop completes.
  Serial.println("Loop Complete\n");
  delay(LOOP_DELAY);
}
Clean version of Gateway code
/// Based on the polleer code from <jc@wippler.nl>
// 2011-11-23 <jc@wippler.nl> http://opensource.org/licenses/mit-license.php
//
//
#include <JeeLib.h>

#define LOOP_DELAY 5000 // Milliseconds
/*
  RF12 Communications
*/
#define RF12_GROUPID 212    // all nodes must be a member of the same group
                          // to communicate with each other
#define RF12_NODEID_GATEWAY  1      // Each node within a group must have a unique ID

// an array of remote node address
#define TOTAL_NODES 2
int listOfNodes[TOTAL_NODES] = {2,5};

MilliTimer timer;

typedef struct {
  byte node;
  long time;
  float temp;
} Payload;

void setup () {
  Serial.begin(57600);
  Serial.println("Gateway");

  rf12_initialize(RF12_NODEID_GATEWAY, RF12_433MHZ, RF12_GROUPID);
}

int remoteNodeIndex=0;

void loop () {

    for(remoteNodeIndex = 0; remoteNodeIndex < TOTAL_NODES; remoteNodeIndex++){
    Serial.print("Poll Node = ");
    Serial.println(listOfNodes[remoteNodeIndex]);
   // send an empty packet to Nanode Remote
   rf12_sendNow(RF12_HDR_ACK | RF12_HDR_DST | listOfNodes[remoteNodeIndex], 0, 0);
   // wait up to 10 milliseconds for a reply
   timer.set(10);
   while (!timer.poll())
     if (rf12_recvDone() && rf12_crc == 0 && rf12_len == sizeof (Payload)) {
       // got a good ACK packet, print out its contents
       // Data from RFM12B returns in rf12_data
       const Payload* p = (const Payload*) rf12_data;
       Serial.print("Node: ");
       Serial.print((word) p->node);
       Serial.print(": ");
       Serial.println(p->temp);
       break;
     }
   }
  Serial.println("Loop Complete\n");
  delay(LOOP_DELAY);
}
Nanode Remote code changes (again the code will appear twice)
// Start of Nanode Remote code
// Based on the pollee code from <jc@wippler.nl>
// 2011-11-23 <jc@wippler.nl> http://opensource.org/licenses/mit-license.php
//
#include <JeeLib.h>

/*
  Status LED
*/
#define BLINK_DELAY 1000 // milliseconds
#define LED_PIN 5  // Status LED

/*
  RF12 Communications
*/
#define RF12_GROUPID 212    // all nodes must be a member of the same group
                                                   // to communicate with each other
First is the #define RF12_NODEID 5, in the original code the 5 was a 2. Each node in the network must have a unique node ID. We have assigned node ID 1 to the gateway and if you remember in the gateway code change above we created an array of node IDs and in our example the node IDs used are 2 and 5. So #define RF12_NODEID 5 needs to be set to 2 when loading code (via FTDI cable) to your first remote sensor and changed to 5 when loading code into your second sensor.
#define RF12_NODEID  5         // Each node within a group must have a unique ID

/*
  Sensor Specific Code
*/
The next code change is the two #define statements for LM34 and TMP36. I’ve changed the sensor code so it can use either of these temperature sensors. The technique of defining which sensor is being used and later selecting one of two blocks of code based on that sensor selection is defined is called conditional compilation.
// uncomment one of the two following lines depending temperature sensor
#define LM34
//#define TMP36

#define TEMPERATURE_PIN A0

// Definition of Data Structure used to send information from Remote to Gateway

typedef struct {
  byte node;
  long time;
  float temp;
} Payload;

// Create an instance of this data structure
Payload mypayload;
The third change is a big one. Two goals were accomplished here, in the tutorial 1 sensor sketch, the code to read the temperature from the temperature chip appeared twice. Once in the setup code and once in the main loop. This is a bad programming practice, instead of duplicating the code in two places we create a function, getTemperature. The function reads the temperature chip and returns the temperature whenever  it is called. In addition to creating a function, there are two code blocks in the function getTemperature. Based on which sensor chip is “defined” using either #define LM34 or #define TMP36, only one clock of code will be compiled into the final program that is downloaded into the Nanode.
// code to fetch temperature from sensor and return as a float
float getTemperature(){
  float temperature;
  float volts;
  int analogData;

#ifdef LM34
  temperature = analogRead(TEMPERATURE_PIN);
  temperature = (5.0 * temperature * 100.0) / 1024.0;
#endif

#ifdef TMP36
  analogData = analogRead(TEMPERATURE_PIN);
  volts = analogData * (5.0 / 1024.0);
  temperature = (volts - 0.5) * 100;  //Celsius
  temperature = (temperature * 9.0 / 5.0) + 32.0;
#endif

  return(temperature);
}

//Arduino Setup code, run once after reset
void setup () {
  int i;

  Serial.begin(57600);
  Serial.print("Remote Sensor\n");

  // Initialize RF12 Radio
  mypayload.node = rf12_initialize(RF12_NODEID, RF12_433MHZ, RF12_GROUPID);

  // Set status LED pin as output
  pinMode(LED_PIN,OUTPUT);
The last two changes are almost identical. In each case the code that actually read the temperature chip and did some calculations is replaced with a call to the getTemperature routine.
  Serial.print("Setup, temperature = ");
  Serial.println(getTemperature());

  // Blink LED 3 times at end of initialize sequence
  for(i = 0; i < 6; i ++){
    toggleLed();
    delay(BLINK_DELAY);
  }
}

// Each call to toggleLed, switches the state of Led from on to off or off to on
int ledState = LOW;

void toggleLed() {

    if (ledState == LOW)
      ledState = HIGH;
    else
      ledState = LOW;
    digitalWrite(LED_PIN,ledState);
}

// main loop
void loop () {
  float temperature;

  // wait to be polled by Gateway
  if (rf12_recvDone() && rf12_crc == 0 && rf12_len == 0 && RF12_WANTS_ACK) {

    // Fill payload with current time in milliseconds
    mypayload.time = millis();
Again the code that actually reads the temperature chip and did some calculations is replaces with a call to the getTemperature routine.
    temperature = getTemperature();

    // Fill payload with temperature info
    mypayload.temp = temperature;

    Serial.println(temperature);

    // start transmission
    rf12_sendStart(RF12_ACK_REPLY, &mypayload, sizeof mypayload);

    toggleLed();
  }
}
Clean version of Remote code
// Start of Nanode Remote code
// Based on the pollee code from <jc@wippler.nl>
// 2011-11-23 <jc@wippler.nl> http://opensource.org/licenses/mit-license.php
//
#include <JeeLib.h>

/*
  Status LED
*/
#define BLINK_DELAY 1000 // milliseconds
#define LED_PIN 5  // Status LED

/*
  RF12 Communications
*/
#define RF12_GROUPID 212    // all nodes must be a member of the same group
                                                   // to communicate with each other
#define RF12_NODEID  5         // Each node within a group must have a unique ID

/*
  Sensor Specific Code
*/
// uncomment one of the two following lines depending temperature sensor
#define LM34
//#define TMP36

#define TEMPERATURE_PIN A0

// Definition of Data Structure used to send information from Remote to Gateway

typedef struct {
  byte node;
  long time;
  float temp;
} Payload;

// Create an instance of this data structure
Payload mypayload;

// code to fetch temperature from sensor and return as a float
float getTemperature(){
  float temperature;
  float volts;
  int analogData;

#ifdef LM34
  temperature = analogRead(TEMPERATURE_PIN);
  temperature = (5.0 * temperature * 100.0) / 1024.0;
#endif

#ifdef TMP36
  analogData = analogRead(TEMPERATURE_PIN);
  volts = analogData * (5.0 / 1024.0);
  temperature = (volts - 0.5) * 100;  //Celsius
  temperature = (temperature * 9.0 / 5.0) + 32.0;
#endif

  return(temperature);
}

//Arduino Setup code, run once after reset
void setup () {
  int i;

  Serial.begin(57600);
  Serial.print("Remote Sensor\n");

  // Initialize RF12 Radio
  mypayload.node = rf12_initialize(RF12_NODEID, RF12_433MHZ, RF12_GROUPID);

  // Set status LED pin as output
  pinMode(LED_PIN,OUTPUT);

  Serial.print("Setup, temperature = ");
  Serial.println(getTemperature());

  // Blink LED 3 times at end of initialize sequence
  for(i = 0; i < 6; i ++){
    toggleLed();
    delay(BLINK_DELAY);
  }
}

// Each call to toggleLed, switches the state of Led from on to off or off to on
int ledState = LOW;

void toggleLed() {

    if (ledState == LOW)
      ledState = HIGH;
    else
      ledState = LOW;
    digitalWrite(LED_PIN,ledState);
}

// main loop
void loop () {
  float temperature;

  // wait to be polled by Gateway
  if (rf12_recvDone() && rf12_crc == 0 && rf12_len == 0 && RF12_WANTS_ACK) {

    // Fill payload with current time in milliseconds
    mypayload.time = millis();
    temperature = getTemperature();

    // Fill payload with temperature info
    mypayload.temp = temperature;

    Serial.println(temperature);

    // start transmission
    rf12_sendStart(RF12_ACK_REPLY, &mypayload, sizeof mypayload);

    toggleLed();
  }
}
Gateway Monitor screen receiving temperature from two Remote Sensors
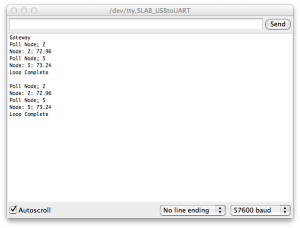
Gateway Serial Monitor (click to enlarge)
That’s it, now you can monitor the temperature for two (or more) locations simultaneously.
Next: Getting your data in Xively (I know I said that last time but this time I mean it)
@ken_rother
Posted: October 16th, 2013 | Author: Ken Rother | Filed under: Nanode, Tutorial | Tags: nanode, Wireless | Comments Off on Nanode Gateway/Remote Tutorial 1
Remote Sensing , pardon me, what was that, what’s the temperature over there?
Note: This is part of series of tutorials on the Nanode
The Arduino has been a transformational device. It is being used everywhere from art installations to the manufacturing floor. A whole new class of makers have gotten their first taste of micro-controllers using the Arduino. An area of particular interest to me is using Arduinos in distributed computing and more specifically remote sensing and the “Internet of Things.†This series of tutorials will walk you through the basics of connecting one or more remote devices to a central gateway and managing the interactions between those devices. These tutorials will cover everything from collecting remote data, storing collected data in a central repository for online viewing, remote activation of devices, and well who knows…..
Let’s get started
Building Blocks:
Nanode Gateway: The original Nanode was designed by London Hackerspace. The Nanode Gateway is an Arduino-like micro-controller with both a standard network connector and an onboard RFM12B radio used to communicate with the remote sensors
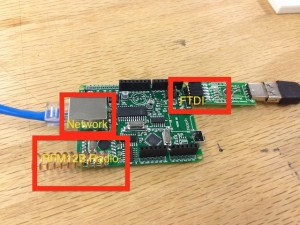
Nanode Gateway (click for larger)
Nanode Remote: The Nanode Remote, also a Nanode derivative, differs from the Nanode Gateway in that it only contains the RFM12B radio and does not contain the network connector.
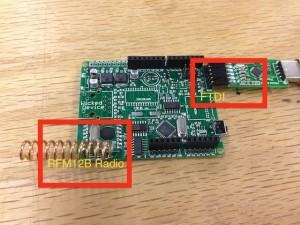
Nanode Remote (click to enlarge)
Check out Jeelabs.org for tons of useful information on the RFM12B radio.
One difference between a Nanode and a standard Arduino is the programming cable. A standard Arduino usually communicates with a host computer via USB, the Nanode uses an FTDI Cable (see photo of Nanode Gateway to see FTDI cable connected). An FTDI cable can be ordered through the Wicked Device Store or several other suppliers.
In addition to the Nanode Gateway, Nanode Remote and FTDI cable, a few other parts are required to complete this first project. A complete kit including a Nanode Gateway and NanodeRemote is available from Wicked Device,  or if you prefer to buy the parts separately, here is a list of what you’ll need for tutorial 1
- TMP36Â Temperature Sensor, available here
- Standard LED – Radio Shack part 276-330
- 220 ohm resistor (red-red-brown code) – Radio Shack part 271-1313
- Prototyping breadboard
- 9 Volt battery
- 9V battery clip Radio Shack part 270-324
- Hookup wire
Circuit
The circuit used on the Nanode Remote has two subsections; a temperature monitor and a status LED. No additional circuit is required for the Nanode Gateway. The two circuits on the Nanode Remote look like this.

Tutorial 1 Circuit (click to enlarge)
Circuit Description
- Connect the positive (anode) side of the status LED (longer lead) to Nanode digital pin 5. Using a 270 ohm resistor connect the negative (cathode) LED lead to Nanode ground.
- The TMP36 has three leads (image link). The 5 Volt lead connects to the Nanode 5 volt pin, the Ground lead connects to the Nanode ground pin, and the signal pin connects to Nanode analog pin A0.
Here are photos of the circuits built on both a standalone breadboard and on an Arduino Proto-Shield
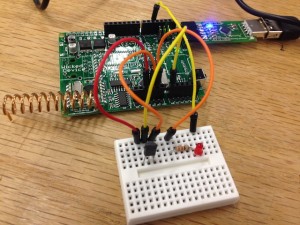
Breadboard circuit Tutorial 1 (click for larger)
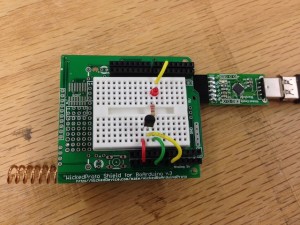
Proto-shield circuit tutorial 1 (click for larger)
Software
The software is divided into two Nanode sketches. “Sketch” is the name used for Nanode/Arduino programs. One sketch is for the Nanode Remote and another sketch for the Nanode Gateway. You should have Arduino IDE 1.0.5 setup on your computer. Check http://arduino.cc/en/Main/Software to get the latest software.
The sketches for both the Nanode Gateway and the Nanode Remote requires JeeLib created by Jean-Claude Wippler. The latest version of JeeLib can be found at https://github.com/jcw/jeelib. Download the zip file and rename the unzipped directory from jeelib-master to jeelib then copy the renamed directory to your Arduino/libraries directory. If you are unfamiliar with how to add a library to your Arduino IDE, checkout the Arduino documentation http://arduino.cc/en/Guide/Libraries, Adafruit also has an excellent tutorial on installing libraries http://learn.adafruit.com/adafruit-all-about-arduino-libraries-install-use/
Let’s Start with the Nanode Remote. At this point you should have the Nanode Remote hardware hooked up as described in the “Circuit†section above.
Here is the sketch, cut and paste it into a new window on your Arduino IDE
// Start of Nanode Remote code

// Based on the pollee code from <jc@wippler.nl>
// 2011-11-23 <jc@wippler.nl> http://opensource.org/licenses/mit-license.php
//
#include <JeeLib.h>

/*
  Status LED
*/
#define BLINK_DELAY 1000 // milliseconds
#define LED_PIN 5  // Status LED

/*
  RF12 Communications
*/
#define RF12_GROUPID 212    // all nodes must be a member of the same group
                                                   // to communicate with each other
#define RF12_NODEID  2         // Each node within a group must have a unique ID

/*
  Sensor Specific Code
*/

#define TEMPERATURE_PIN A0

// Definition of Data Structure used to send information from Remote to Gateway

typedef struct {
  byte node;
  long time;
  float temp;
} Payload;

// Create an instance of this data structure
Payload mypayload;

//Arduino Setup code, run once after reset
void setup () {
  int i;
  float temperature;
  float volts;
  int analogData;

  Serial.begin(57600);
  Serial.print("Remote Sensor\n");

  // Initialize RF12 Radio
  mypayload.node = rf12_initialize(RF12_NODEID, RF12_433MHZ, RF12_GROUPID);

  // Set status LED pin as output
  pinMode(LED_PIN,OUTPUT);

  // Print temperature to monitor
  /* LM34 CODE */
  //temperature = analogRead(TEMPERATURE_PIN);
  //temperature = (5.0 * temperature * 100.0) / 1024.0;

  /* TMP36 CODE */
  analogData = analogRead(TEMPERATURE_PIN);
  volts = analogData * (5.0 / 1024.0);
  temperature = (volts - 0.5) * 100;  //Celsius
  temperature = (temperature * 9.0 / 5.0) + 32.0;
  Serial.println(temperature);

  // Blink LED 3 times at end of initialize sequence
  for(i = 0; i < 6; i ++){
    toggleLed();
    delay(BLINK_DELAY);
  }
}

// Each call to toggleLed, switches the state of Led from on to off or off to on
int ledState = LOW;

void toggleLed() {

    if (ledState == LOW)
      ledState = HIGH;
    else
      ledState = LOW;
    digitalWrite(LED_PIN,ledState);
}

// main loop
void loop () {
  float temperature;
  float volts;
  int analogData;

  // wait to be polled by Gateway
  if (rf12_recvDone() && rf12_crc == 0 && rf12_len == 0 && RF12_WANTS_ACK) {

    // Fill payload with current time in milliseconds
    mypayload.time = millis();

    /* LM34 CODE */
    //temperature = analogRead(TEMPERATURE_PIN);
    //temperature = (5.0 * temperature * 100.0) / 1024.0;

    /* TMP36 CODE */
    analogData = analogRead(TEMPERATURE_PIN);
    volts = analogData * (5.0 / 1024.0);
    temperature = (volts - 0.5) * 100;  //Celsius
    temperature = (temperature * 9.0 / 5.0) + 32.0;

    // Fill payload with temperature info
    mypayload.temp = temperature;

    Serial.println(temperature);

    // start transmission
    rf12_sendStart(RF12_ACK_REPLY, &mypayload, sizeof mypayload);

    toggleLed();
  }
}
// End of Nanode Remote Code
Once this code is cut into your Arduino IDE your screen should look like this
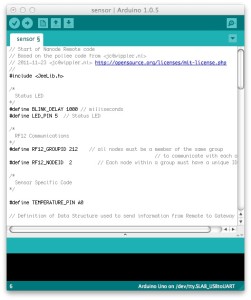
Remote sketch (click for larger)
Try verifying that the code compiles correctly by clicking the check mark at the upper left of the Arduino IDE

Arduino IDE verify (click to enlarge)
If you are getting errors there is a good chance that the JeeLib library was not installed correctly.
Once the code compiles correctly connect an FDTI cable to the USB port of your computer and connect the other end to the Nanode Remote. Pay close attention to the orientation of the FTDI cable when connecting to the Nanode. In particular, make sure the Nanode FTDI pin marked black is lined up with the FTDI cable pin marked GND.
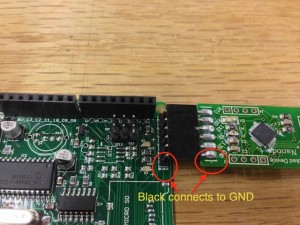
FTDI with Nanode FTDI cable (click to enlarge)

FDTI – Standard FTDI cable (click to enlarge)
Now download the code to your Nanode Sensor. You will need to set the board type on your Arduino IDE to UNO (Tools->Board Type->Arduino UNO)
You will also need to set the serial port on your Arduino IDE (Tools->Serial Port->). If you are unsure which serial port corresponds to the FDTI cable, remove the FDTI cable from your computers USB port and look at the serial ports available in the Serial Ports drop down menu of the Arduino IDE (Tools->Serial Port). Now reconnect the FTDI cable to the USB port and again look at the available serial ports in the Arduino IDE, you should see one or more new ports, try selecting one of the new ports and downloading your code to the Nanode Remote.
If you are seeing an error during download try selecting the other new port that became available after reconnecting the FTDI cable to your computer.

Arduino IDE Download (click to enlarge)
Once the code is successfully downloaded, open the serial monitor on your Arduino IDE by clicking the icon in the upper left corner.

Start Serial Monitor (click to enlarge)
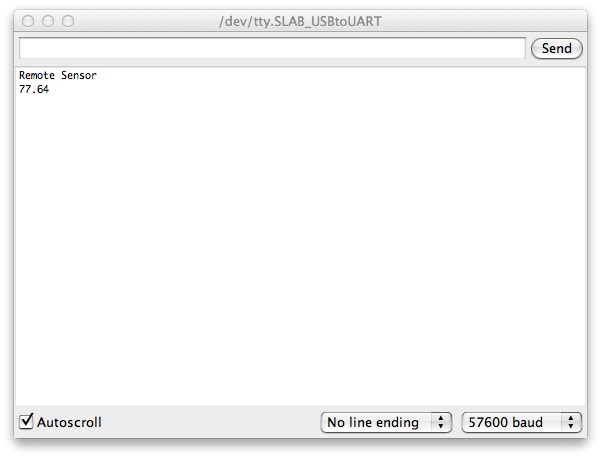
Set the serial monitor baud rate to 57600 (bottom right corner). Click the reset button on the Nanode Remote. The status LED you wired to digital pin 5 should flash 3 times, your Arduino Serial Monitor should now look something like this.

Nanode remote monitor screen grab (click to enlarge)
You are all done setting up the Nanode Remote, disconnect your Nanode Remote from the FTDI cable.
OK, let’s move on and setup the Nanode Gateway. For this first project we won’t be connecting the Nanode Gateway to any networks so don’t worry about the network connector. Paste this code into a new Arduino IDE window.
//Start of Gateway code
/// Based on the polleer code from <jc@wippler.nl>;
// 2011-11-23 <jc@wippler.nl>; http://opensource.org/licenses/mit-license.php
//
//
#include <JeeLib.h>;

#define LOOP_DELAY 5000 // Milliseconds
/*
  RF12 Communications
*/
#define RF12_GROUPID 212    // all nodes must be a member of the same group
                          // to communicate with each other
#define RF12_NODEID_GATEWAY  1      // Each node within a group must have a unique ID
#define RF12_NODEID_REMOTE 2

MilliTimer timer;

typedef struct {
  byte node;
  long time;
  float temp;
} Payload;

void setup () {
  Serial.begin(57600);
  Serial.println("Gateway");

  rf12_initialize(RF12_NODEID_GATEWAY, RF12_433MHZ, RF12_GROUPID);
}

void loop () {
  // send an empty packet to Nanode Remote
  rf12_sendNow(RF12_HDR_ACK | RF12_HDR_DST | RF12_NODEID_REMOTE, 0, 0);

  // wait up to 10 milliseconds for a reply
  timer.set(10);
  while (!timer.poll())
    if (rf12_recvDone() && rf12_crc == 0 && rf12_len == sizeof (Payload)) {
      // got a good ACK packet, print out its contents

      // Data from RFM12B returns in rf12_data
      const Payload* p = (const Payload*) rf12_data;
      Serial.print("Node: ");
      Serial.print((word) p->node);
      Serial.print(": ");
      Serial.println(p->temp);
      break;
    }
  delay(LOOP_DELAY);
}
//End of Gateway code
Now connect your Nanode Gateway to your FTDI cable, again be careful to get pins aligned correctly. Download the gateway code into your Nanode Gateway and start the the Arduino serial monitor. You should see something like this
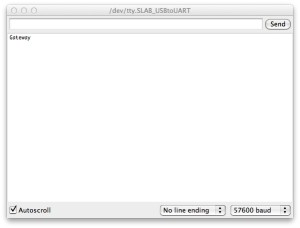
Gateway monitor – no remote (click to enlarge)
Now the big step. Connect the 9 Volt battery clip the the Nanode Sensor ground and Vin pins. Be very careful to get the polarity correct. Of course you could power the Nanode Remote via the micro-usb connector or the FTDI connector.
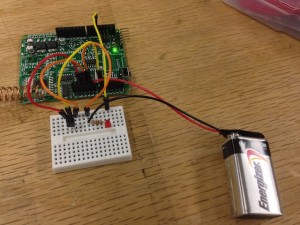
Battery powered remote (click to enlarge)
If everything goes according to plan you should now see temperature reports displaying in the Arduino serial monitor connected to your Nanode Gateway. Your screen should look something like this.
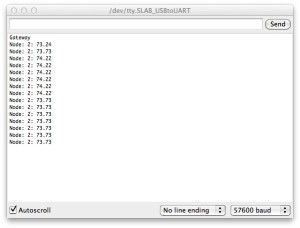
Gateway receiving temperature data from remote (click to enlarge)
Congratulations, you are now on the IOT superhighway, or at least you have taken the on-ramp.
BTW: Differences between standard Arduino and a Nanode
The onboard Nanode features such as the network connector and RFM12B radio use existing Arduino I/O pins for control. Check out this table for a list of used and available I/O pins. Except for those pins used for specific Nanode functions the Nanode is Arduino compatible in form factor, connectors, and software.
Next
How to get this data into Xively
@ken_rother
Posted: September 17th, 2012 | Author: admin | Filed under: Uncategorized | Tags: nanode | Comments Off on New Nanode Bootloader
A new version of Optiboot for the Nanode is available, and you can update your Nanode with an ISP programmer. It’s built from the latest and greatest optiboot source which fixes a couple of bugs and makes some important improvements.
- Supports the Watchdog Timer
- Blinks the Nanode LED (on D6) during upload
One usage change: when using the Arduino IDE, select “Uno” as the board, not “Duemilanove”.
All Optiboot programmed Nanodes sold by Wicked Device will be using this new version.
Posted: November 7th, 2011 | Author: Vic | Filed under: Software | Tags: advanced, debug, howto, nanode, network, software | Comments Off on Debugging Network Software

I want to spend a couple paragraphs writing about Networks and debugging code running on the Nanode (or Arduino Ethernet for fthat matter) that uses them. I realize this blog entry is not for everyone, and probably will get it’s share of <yawns>, but it’s super important knowledge for when everything doesn’t go your way on networks. With Arduino sketches, you are kind of stuck with Serial.print(...) and LEDs to get insight into what’s going on, but that’s really pretty ineffective when it comes to network interactions. Honestly, for most users the network stuff better “just work” or they are going to be turned off pretty quickly. I , however, am not one to throw in the towel when the networking stuff doesn’t work, and hopefully I can shed some light onto what can be a shadowy space in the programming / debugging landscape. There’s no substitute for using the right tool for the job.
So given that printing to the console can only get you so far with network code debugging, what is a perplexed programmer to do? Well your best choice at that point is to look at what’s going on “on the wire.” In most realms, that means busting out an oscilloscope or logic analyzer, but in the networking world, we have much better / more appropriate tools available for the job. There’s an excellent, indispensible, and free(!) program called WireShark that you can download for just about any platform. WireShark allows you to capture all the traffic on any Ethernet interface (e.g. your network card) and dig into the details of the packets, which, I might add, it conveniently parses out for you for all but the most obscure protocols. You can also set up your capture with filters on pretty much anything you can imagine related to the packet contents (MAC addresses, IP addresses, whatever). And get this, you can check a box in the capture that will have your network card capture all the traffic that it sees (not just the stuff destined for it).
Here’s the rub, though. Unfortunately (or fortunately depending on your perspective) most networks today are equiped with “smart switches,” which eliminate collision domains, which means your network card only ever “sees” those packets which are legitimately destined for it (or broadcast / multicast). So while Wireshark is an awesome tool, it alone can probably not help you debug what’s going wrong with your Nanode software. To unleash the debugging power of WireShark on your Nanode, you’re going to need some “dummer” hardware, namely an Ethernet Hub. Good luck finding one at a retail store – I had to resort to the E-bay for mine, and got an 8-port hub for about $10.
A Hub is very similar to a switch in that it gives you more places to plug into your network. The big difference with a hub is that it internally connects all the ethernet wires together (well sort of) so that all the devices connected to the hub get to “see” each others packets, unfettered by the intelligent filtering of a switch. So if you plug in the ethernet cable from your computer into the hub, plug in the ethernet cable from your Nanode into the hub, connect your hub to your router, and run WireShark, both your computer and your Nanode should be able to get “on the internet.” More importantly, your computer running WireShark will be able to “snoop” on the internet traffic going to and from your Nanode! Now we’re in business. Often times you can look at what the network traffic is supposed to look like using your computer (by filtering on traffic coming to/from your computer’s MAC address for example) and all the fancy-pants network tools that come with it (especially if you’re on a linux box), then compare that to what happens when your Nanode participates in an analogous network exchange (by filtering on the Nanode’s MAC address for example).
Armed with these tools (and some practice, and some reading about protocols), you’ll be able to get to the bottom of your network problems in no time!
Posted: September 12th, 2011 | Author: admin | Filed under: Nanode | Tags: bootloader, nanode | Comments Off on Uploading sketches over Ethernet
As you may know, we have been working on a new bootloader which lets you upload sketches over Ethernet. Being able to upload a sketch from anywhere has a bunch of obvious advantages. Here is a video of an early version bootloader which goes and fetches a sketch from a TFTP server and burns it.
Ethernet Bootloader from Wicked Device on Vimeo.
It’s worth emphasizing this is an early alpha build. It currently only works over a local area network, not across the internet, and also requires you to press the reset button on the Nanode**. Still, it seems a good milestone. Next steps are to clean it up a bit, make it a little bit more robust.
** A Nanode is an ethernet enabled Arduino clone available here as a kit.
Posted: August 13th, 2011 | Author: Vic | Filed under: Wireless | Tags: nanode, pachube, sensor, software, wickedreceiver, Wireless, wNode, wReceiver | Comments Off on Nanode + WickedNode + DHCP + DNS + Pachube!

The other day I got my Nanode talking to Pachube! That in and of itself is pretty cool, and it was also pretty easy given that there are a fair number of examples out on the web and a well documented API for interacting with Pachube. I extended some of these examples to use our Wicked Node and post received data to a Pachube sensor feed. I think my biggest contribution here perhaps was a bit of refactoring of the code so that the major chunks are re-usable in future sketches. Maybe some of it can maybe even make it’s way into the EtherShield library. I’ll provide my sketch attached to this post for anyone who wants to check out the details. I also want to share some general knowledge about debugging networks and software that interacts with networks, which I’ll dedicate my next post to.
So part one – the general program flow goes like this:
setup()
   1. Set Serial to 2400 baud (for radio interface)
   2. Initialize the Ethernet interface with a MAC address
   3. Get an IP address using DHCP (optional)
   4. Initialize the IP/UDP/TCP stack with a MAC address, IP address, and WWW port
   5. Set the Gateway and DNS IP addresses
   6. Wait for the Gateway to recognize the Nanode
   7. Resolve "api.pachube.com" to an IP address using DNS
   8. Initialize the Web Client part of the EtherShield library
loop()
   1. Wait for wireless sensor data to be recieved
   2. When data is received populate a template string and post it to Pachube
Pretty simple, right!? Well there is an example with the EtherShield library for demonstrating DNS and a separate example for demonstrating DHCP, and another example that demonstrates Pachube (getting information *from* Pachube actually), but besides the DHCP example, nothing really tied in DHCP; the other examples just use static IP addresses and call it day. So I refactored the code in the DHCP example so as to make the acquisition of an IP address over DHCP into a function call that I could just call from setup(). I insightfully named this function acquireIPAddress, and I’m pretty sure it will be useful in many a sketch in the future (for me and others I hope). Similarly in looking at the DNS example, it was kind of hard to see how you ended up with a resolved address, so I made another function that I think is a little more intuitive from an API standpoint that takes a null-terminated string as the address to resolves and a buffer into which it puts the resolved IP address. I decided not to get too creative and named this function resolveHost.
I think factoring out these two functions really makes reading the setup and loop functions a whole lot more digestible to the average human. As a last step I tidied up my code and moved things around so that all the configuration for the sketch is up top, including whether you want to use static of dynamic IP parameters, your Pachube API key and how you format and populate your Pachube post template. If you want to use the sketch as a basis for your own application, you’ll have to download the EtherShield library and WickedReceiver library and drop them in your Arduino libraries folder to get it all to compile.
Have fun getting your Nanode onto the internet and let us know what cool things you’re doing it!
Download the Sketch Here:Â Pachube_WickedNode
Check out this other blog post for a variation on the sketch that doesn’t use the Wicked Node, but instead posts ADC inputs directly from the Nanode.
Update: 12/14/2012 – The EtherShield library was retired earlier this year in favor of the EtherCard library. At some point I may get around to making another update to this post, but the EtherCard library already comes with a pretty easy to follow Cosm (the new name for Pachube) sketch. As always, feel free to post to our forum if you have questions.
Posted: July 25th, 2011 | Author: admin | Filed under: Uncategorized | Tags: Arduino, ethernet, nanode, pachube | Comments Off on New Product: The Nanode

T he Nanode is a cool Ethernet enabled Arduino clone all in one kit for sale at $39.95, including shipping, which is a pretty good deal. It Also includes a year’s subscription to Pachube Pro, a $25 value. So all it all it is great value for money.
We have been working with Ken Boak, the inventor of the Nanode, who is based in London and worked with the London Hackerspace to create the Nanode. It has made a big impact there, and is used in projects like the Open Energy Monitor, which I’ll be blogging about in the future.
If you want to find out more about the Nanode, this website has a step by step build, application info, IRC chat and more. We’re really looking forward to doing some fun stuff with it.