Posted: March 10th, 2014 | Author: admin | Filed under: Uncategorized | Comments Off on An embeddable ARM board, the ARMiGo
This is a guest post by Ken Boak (@monsonite).
 As integrated circuits get smaller, and more powerful, it becomes increasingly difficult for the hobbyist to utilise them easily. Soldering tiny SMT parts is a challenge for many – but an amazingly useful skill, once mastered.
32 bit ARM microcontrollers are now virtually the same cost as older 8 bit devices, yet offer a many fold increase in performance, as a result of their 32 bit architecture and faster clock speed. In addition to this, they come with a rich set of peripherals, making them ideal for more demanding applications.
For the hobbyist who may have first gained exposure to microcontrollers via 8 bit products such as the Arduino, the move to 32 bit may appear a little daunting. Â However we all have to progress and keep up with the times, and so now the time has come to move up to the “big school”.
For a particular microcontroller to gain traction in the hobbyist community, it has to meet a few basic requirements:
- Low cost development boards
- Free to use, open source toolchain
- Lots of online code examples, projects, forum support
- Support from a vibrant user community
- Easy to use and incorporate into projects
- Easy to upgrade to different devices from within the same microcontroller family
1. Â Low Cost Hardware
After some investigation, and triggered into action by exceptionally low cost development boards, I have settled on the ST Microelectronics STM32F range of microcontrollers as being the basis for future projects.
These micros are already being used extensively in a range of hobbyist boards including Maple, Netduino, Olimex, Expruino, mbed, MicroPython and STM’s own range of very low cost Discovery boards, which are priced around the  $11 – $18 range.
A recent offering from mbed in collaboration with ST is offering boards for as little as $10, and come complete with a detachable ST Link programmer, which can be used for programming other boards. These boards are now available from suppliers including Newark,  Mouser, Digikey.
Low cost hardware is the new trend, with dev kits often being sold at close to cost price, so gone are the days when you forked out $30 for your first Arduino, and then another $30 when you wanted to build it into a more permanent project.
2. Â Open Source Toolchain
Free to use toolchains are nothing new. Microchip realised in the 1990’s that they would sell more chips if they made the coding tools free. Fortunately the ARM microcontroller is supported by GCC, and there is a free to use IDE,  called CooCox CoIDE, which supports a wide range of ARM chips from several main manufacturers.
3. Lots of Online Support and Code Examples
Getting started with ARM chips is as easy as dowloading the free tools, installing some drivers and learning the basics from a wide range of code examples easily found online.  The STM32 range of microcontrollers have been available for about 4 years now, and so there is a rapidly growing resource of online code examples, reference designs and supporting documentation. ST Microelectronics produces a firmware pack for all of its evaluation and Discovery boards, and this is a good place to start for code examples. Other online examples,  which are easily Googled, are downloadable from repository sites such as Github amongst others. YouTube is also a good place to search for STM32 projects. As the processors are considerably more powerful than 8 bit devices, they are often used with LCD colour displays, and there are several examples of these on YouTube.
4. A Large User Community.
All popular devices build up a loyal user community and the STM32 is no exception. Â The popularity is driven by low cost hardware and free tools, and is ever expanding as new products based on the STM32 are released. Â Again a simple Google search will often turn up a blog from an enthusiast who has already covered a lot of ground and is happy to share it.Â
5. Easy to Incorporate into Projects.
This is where things are not so clear-cut. Â The problem with most dev boards is that they are either too big, or use header pin layouts that are incompatible with breadboard or stripboard. Â This can be a major inconvenience, and often force the user to buy some form of shield for mounting other hardware expansion, or resort to using female/male jumper leads, so that the headers can be jumpered into a breadboard. Either way the result is not ideal, and a rat’s nest of jumper wires is neither permanent nor easy to work with.
6. Easy to move between devices in the STM32 family range.
There are now a considerable number of devices in the STM32Fxxx family, based broadly around the Cortex M0, M3 and M4 ARM architectures. Whilst to the newcomer the range of different parts may seem confusing, STM have designed the family in such a way which makes it relatively easy to move between parts.
The first thing to realise is that they are all microcontrollers, with on chip SRAM, and only the larger packaged parts will support external memory.
Secondly, all parts share identical, or very similar I/O and peripheral architectures, so if you are using USART 1, or Timer 2 on a 48 pin pack, you will find the same peripherals, and more, in the 64, 100 and 144 pin packages.
Thirdly, you will find that you can switch between family members – because specific packages share common pin-outs. This means if you have designed a pcb for a 48 pin STM32F103, and you want to move up to the STM32F303, then you will find all the ports, clock lines and power pins are exactly the same – so no pcb changes are needed.
Here are some guidelines to selecting a part:
- How much I/O will my application require? Â The GPIO ports are 16 bits wide, and devices are made with between 2 and 8 ports. Â The 48 pin package provides 2 ports PortA and PortB, Â the 100 pin package provides 5 ports PortA – PortE.
- Choose the appropriate amount of flash memory and SRAM. Â The smaller parts have 128kB of flash and 32kB of SRAM. The largest parts have 2MB of flash and 256k of SRAM.
- Choose the Cortex family member. M0 is the cheapest with the slowest clock, and generally without USB. M3 is a good starting point with a 72MHz clock and on chip, full speed USB. Â M4 is similar to M3, but supports clock speeds up to 180MHz and has a floating point unit (FPU) which may be useful for intensive maths code such as used in robotics and flight controllers.
 Getting Started.
 Initially I bought a Discovery F3 development board, which uses a 100 pin STM32F303 processor and has  compass, accelerometer and gyro devices on the board. It was exceptionally good value at under $11 from Newark.  However, whilst it provided a platform to get me started writing code and getting the framework to support my application built, it was just too big and the double row headers are not the friendliest of connectors to use. I didn’t need all of the  80 lines of I/O provided by the 100 pin device,  so I settled on the 48 pin part, which somewhat smaller, cheaper and more manageable in terms of pcb layout.
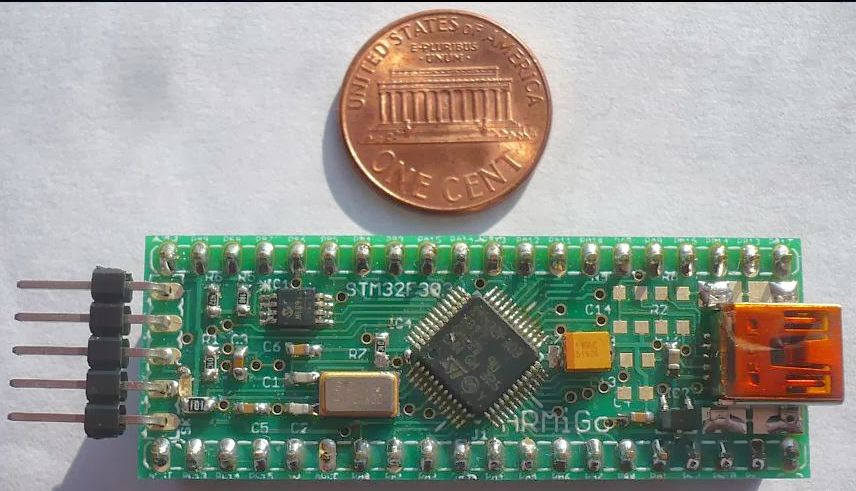
 My solution was to create a 2″ x 0.75″ (51mm x 19mm)  double sided pcb, which mounts the STM32F303 microcontroller,  its clock and reset circuits and USB/programming connectors. This small breakout pcb, converts the pins from the 48 pin LQFP to an easier to use 40 pin dual in line module, and provide the minimum of features to get the STM32 to load and run code.
This approach is not new and has been used in minimalist products such as the Maple Mini and the Arduino Pro Mini. Micro and Nano, all of which have been around for some time.
I decided to name the board “ARMiGo” in respect to its user friendliness and I designed the ARMiGo to be as open and flexible as possible, so that it can be used as a core for incorporation into other designs.  The essential parts of that core are the microcontroller, the 8MHz crystal, the reset circuit, USB connection and programming header.Â
The first of the prototypes arrived this week, and now working running some simple test code.
ARMiGo uses the STM32F303 Cortex M4 ARM device which runs at a maximum of 72MHz. Â The pcb also supports the STM32F103 which is based on the M3 core.
The board is the same size as a standard 40 pin DIL format IC – making it ideal for breadboarding, and small enough to be used as a plug in module in a 40 pin socket, on a larger board.
All 35 I/O lines of the ARM chip are brought out to standard 0.1″ (2.54mm) spaced headers.
The 5 pin right angle header on the left accepts the clock and data signals from the “ST-Link” programmer/debugger device.  These are available very cheaply but it is relatively simple to use the embedded STM bootloader and program it via either the mini-B USB connector on the right or via one of the USART channels.
There is a really rich mix of on-chip peripherals, which gives these small ARM parts tremendous flexibility – including the following:
- Full speed USB interface
- 4 Â Fast (5 Msps) Â 12bit ADCs, each with up to 4 input channels
- 4 Programmable gain op-amps and 7 comparators
- 2Â 12 bit DACs
- 3 Â USARTS
- 3 Â SPI
- 2 Â I2C
- RTC with 32768 Hz oscillator and dedicated output pin for “alarm”
- 10 timer channels, Â 2 basic, Â 6 general purpose and 2 advanced:
5  General purpose  16 bit timer channels with up to 4 outputs for PWM generation, timing, counting etc.
- 1 general purpose 32 bit counter/timer – for optical encoder reading etc
- 2 advanced 16 bit timers for complimentary PWM generation etc.
In addition, the analogue section of the IC contains programmable gain op-amps and comparators which feed the ADC channels, and can be used to replace external analogue circuitry.
This small 48 pin packaged part contains 128KB of Flash and 40KB of SRAM – of which 8K can be battery backed up when the rest of the IC is powered down.
Posted: May 6th, 2013 | Author: Vic | Filed under: Uncategorized | Comments Off on Air Quality Egg: Firmware/Software Update
Here’s the quickie summary. I reorganized the software on the Air Quality Egg to do the conversion math on the Nanode. Good news is this seems to be giving better results. The downside is it was a fairly broad impact, and I believe every board needs to be reprogrammed to get the system running at the latest baseline. I haven’t yet pushed the updated software and binaries up to Git Hub, but I’m running it and observing this feed, so far so good.
I’ve previously published instructions on how to reprogram the Nanodes using an FTDI-compatible programming cable in videos that are linked on the FAQ. I also plan to make a video that shows how to re-program the Sensor Shield and add-on modules, though that is admittedly not as easy as I’d like it to be for the average user.
I really want the fielded Eggs to get to latest version of the software though, so I’m willing to  reprogram units personally, at no additional cost, if you send them back to us and just pay for the round trip shipping. I know this is a real hassle for our international community members, with customs and all. If there are community members that are willing to be “local experts” for reproramming Eggs that would ease the process. If you are willing to be a volunteer in this capacity please let me know at support AT wickeddevice DOT com. It would be really great to have some local people help support Europe, Asia, and Australia.
Technical Details
Math Code Refactoring
The sensor shield code now responds with a record containing the following information in response to the EGG_BUS_SENSOR_BLOCK_RAW_VALUE request:
   uint32_t adc_value     :: the analog-to-digital conversion (ADC) count
   uint32_t low_side_r    :: the low side resistance associated with the ADC count
   uint32_t sensor_vcc    :: the high side voltage applied to the sensor divider circuit
   uint32_t adc_vcc       :: the reference voltage of the ADC
   uint32_t max_adc_value :: 2^(ADC # of bits), e.g. 2^10 = 1024 for a 10-bit ADC
Given this information, the Nanode computes the measured resistance as follows (using floating point math):
   vx = (adc_value / max_adc_value) * adc_vcc; // this is the voltage divider output voltage
   sensor_resistance = (sensor_vcc - vx) * low_side_r / vx;
And the value of the independent variable used for computing the interpolated response is calculated as sensor_resistance / R0, where the (mutable) calibration value R0 and the piece-wise linear response function table is retrieved from the sensor shield and applied as previously.
A few side note here:
- This refactoring effectively deprecates the EGG_BUS_SENSOR_BLOCK_MEASURED_INDEPENDENT field, as that quantity is now computed on the Nanode as a derived value. This is all obviously “hidden” in the EggBus library, but I did want to make that clear.
- I tried to keep enough information on the endpoint to allow for future flexibility. I could have included less information in the EGG_BUS_SENSOR_BLOCK_RAW_VALUE response, but it would be less generic. With the interface defined as above, a sensor endpoint could for example use a 24-bit ADC, or a different voltage reference, and so forth, without loss of generality.
- The terms may mean different things to different sensor endpoints, but they can rely on the Nanode to use them in downstream calculations as described above. The dust sensor, for example, has “occupancy” in “hundredths of a percent” as it’s raw value. To respect the calculation stream, the dust sensor now reports adc_value = 1, max_adc_value=1, adc_vcc=1, low_side_r=1, sensor_vcc=(occupancy + 1), and r0=100.
Data Refactoring
In the updated software, for each sensor there are three values reported to Cosm on every sample interval:
- Raw Value := the result of the sensor_resistance calculation above. Tagged with “aqe:data_origin=raw”
- Computed Value := the result of the interpolation calculation derived from the Raw Value, R0, and the piece-wise linear transfer function. Tagged with “aqe:data_origin=computed”
- R0 := reporting this to Cosm once calibration enters the picture we’ll need to recognize that this value may vary over time, but this should be a mostly constant. Tagged with “aqe:data_origin=r0”
One thing to note, I’m changing the meaning of the raw value feed here. Where previously it reflected the “independent variable” (i.e. the quantity resistance / r0), it now reflects the sensor resistance.
Library Updates
There have been some updates to the Ethercard library in recent months. I’m not sure, but perhaps the latest library baseline addresses the issue causing some Air Quality Eggs to freeze up in the field, requiring a restart to resume publishing data to the web.
Posted: April 16th, 2013 | Author: admin | Filed under: Uncategorized | Comments Off on Air Quality Egg: Research Findings
I’ve been looking at a lot of the data being published and trends in questions on the forum, and there is a theme developing. The results are not consistent with expectations. We’re also now getting some reports from laboratory studies that are confirming there’s a problem. The collective information strongly suggests that the data the Air Quality Eggs are reporting is incongruent with the natural response of the sensors.
In light of this growing body of evidence, I built a much simplified reference circuit based on the sensor datasheets and recorded sensor readings along side the Egg for several hours. Sure enough, the reference circuit exhibited a fairly smooth / continuous response over time. The Egg did not.Â
I decided the rational thing to do was to conduct a series of controlled experiments in an effort to establish the root cause of the variation between the Sensor Shield and the Reference Circuit behavior. This was a daunting proposition with so many potential variables in play, but I did my best to come up with some viable hypotheses. The fundamental differences between the reference circuit and the Sensor Shield / Air Quality Egg are:
- The Air Quality Egg had a fan (which affects airflow and electrical load), the reference circuit did not
- The Air Quality Egg was in an enclosure, the reference circuit was not
- The Sensor Shield dynamically controlled the heater voltage, the reference circuit did not
- The Sensor Shield dynamically selected the voltage divider, the reference circuit did not
For the first two bullets I did a series of tests that ultimately revealed the enclosure didn’t have much of an impact, but that disconnecting the fan from the Air quality Egg circuit has a very noticeable impact. As a quick aside, all of the following graphs have elapsed time in milliseconds on the x-axis and ADC counts on the y-axis. The following graph compares the response of the reference circuit, to an Air Quality Egg with a fan and enclosure, and to an Air Quality Egg with neither a fan nor an enclosure.

The difference is readily apparent. The data with the fan (red) has a bout 50 ADC counts of noise on it. The data with no fan (blue) in the circuit, however, still had a peculiarity of these randomly appearing spike discontinuities in the data. I made modified builds of the Sensor Shield firmware that took out the Heater Control algorithm, took out the Range Selection algorithm, and took out both. Â The result of taking out both looked like this (with and without an enclosure) in comparison to the reference circuit.

Lo and behold, with the fan removed and the software sophistication removed, the Air Quality Egg response has neither noise nor spikes, and it seems to track the reference circuit quite well. I then added just the Heater Control algorithm back in and I got this result:

This confirms, in my view, that the Heater Control algorithm is the source of spiky-ness in the Air Quality Egg data. I’m currently studying the software intensely to come up with an improved version of the Sensor Shield firmware, and will post another update when I know more.
Posted: February 14th, 2013 | Author: admin | Filed under: Uncategorized | Comments Off on Air Quality Egg status update
All,
It has been awhile. Here is an update on the Egg.
If you ordered:
- an egg with no add-ons (Just the basic egg),
- a shield only or
- a Kit,
Then we have shipped your order. If you don’t think we have, then please contact support AT wickeddevice.com
If you ordered an Egg with any add-ons (Ozone, VoC, etc), we have not shipped your egg yet, but will be doing so soon (starting next week).
If you ordered a radiation module, as noted in January, Joe Saveedra has been kind enough to design and help with delivering it.
Posted: February 7th, 2013 | Author: admin | Filed under: Uncategorized | Comments Off on Wicked Device announces strategic partnership with ITT Exelis
ITT Exelis (NYSE: XLS) and Wicked Device LLC have entered into a strategic partnership to explore innovative technology to provide real-time weather information at a hyper-local scale.
Wicked Device is developing an embedded system to integrate with Exelis’s Helios™ platform. The Helios platform enables traffic and other cameras to function as weather sensors, providing more accurate, real-time environmental intelligence for better decision-making and response.
The Helios platform integrates networks of surveillance cameras already in use to watch traffic, facility security and railroad assets for weather monitoring. It aggregates disparate images into a single source and uses algorithms and image processing to reveal actionable real-time environmental intelligence. Providing hyper-local weather data, versus regional data, to national and local agencies, utility companies, transportation services and first responders can help in their decision-making process, saving lives and resources.
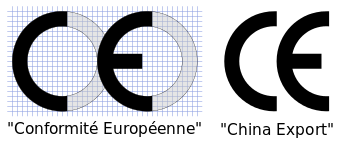 Take a look at the two logos above. One is the familiar CE mark – meaning that the product has conformed with a bunch of EU health, safety and other standards. The one on the right means “China Export”. It makes no claims to any health or safety standards I am aware of, and “is placed arbitrarily“. One can’t help thinking that the China Export logo is intentionally similar to the CE mark, but that can’t be right, can it?