Posted: January 15th, 2013 | Author: Vic | Filed under: Uncategorized | Comments Off on Air Quality Egg: The Making of a Sensor Data Point
I have been wanting to write this blog post for a while. I hope this article will give some insight to the Air Quality Egg community about how the system works end-to-end. I want to provide details about how the Air Quality Egg software and hardware work hand in hand to provide an extensible platform for getting data from the a transducer (sensor) to the internet. I’ll try and structure this in into sections are data-centric, framing it in the context of the “lifespan” of a sensor reading. I chose to write it with a biologically inspired vantage point, hopefully it’s not too lame.
Inception
When you turn on your Base Egg, it broadcasts its MAC address (unique ID) for a period of about 30 seconds (the pairing interval) while illuminating the shell with a yellow pulse. During this time, the Base Egg is offering itself for pairing in order to establish a data link with a Remote Egg. A Remote Egg, in turn, listens patiently for Base Egg advertisement broadcasts for about a 15 second period after power up. A Remote Egg hearing a Base Egg stores away that Base Egg address in persistent memory (EEPROM). Base Eggs are not “monogamous” and willingly accept data from any Remote Egg that is within range and has learned the Base Egg’s advertised address during the pairing interval. Neither do Remote Eggs “mate for life.” They can always be paired to a new Base through the same procedure. They are nevertheless “loyal” in that if they reset, hear no new Base Egg advertisements, and have previously paired with a Base Egg, they will resume communicating with that previously paired Base Egg.
Nurturing
Every sensor hosted by the system has a small microcontroller attached to it. The job of this microcontroller is three-fold. It:
- Provides the interface to the Egg Bus.
- Performs any tasks necessary to keep the sensor happy and safe, for example regulating the heater power for a CMOS ozone sensor.
- Is responsible for actually reading the sensor at the lowest level, be it through analog-to-digital conversion like the CMOS gas sensors, or a time-based digital occupancy measurement like the dust sensor.
This federated sensor management architecture separates the concern of how each sensor is dealt with into bite-sized, compartmentalized fragments, and allows the system to scale well locally. A major upside to the standardized interactions is that it allows you to plug in new sensors into the system without needing to change the software running on your Air Quality Egg. Another big upside is that new sensors can be developed by anyone because of the openness of the interface, software, and hardware.
Discovery
In the Remote Egg, Sensors are attached to the Egg Shield through the Egg Bus. The Remote Egg, at one minute intervals, searches the Egg Bus and finds attached sensors. Upon encountering a sensor, it interrogates it for a variety of information. Using the information gleaned by the Egg Bus, the Remote Egg calculates both a “raw” and “computed” sensor reading.
In a similar theme of discovery, the first time you plug your Base Egg into your network it reaches out to Cosm over the internet and attempt to negotiate the creation a feed where it will ultimately store your Egg’s data. This mechanism is enabled by the fact that each and every Air Quality Egg is labeled with a Unique ID that is also bound to the physical hardware, sort of like your Egg’s fingerprint! When you enter your Egg Serial Number into airqualityegg.com and fill out the form, this process is enabled.
Migration
Having discovered a sensor, and having calculated the raw and computed data points, the Remote Egg ships it wirelessly to its paired Base Egg in a Sensor Packet. The Base Egg, upon receiving, a Sensor Packet addressed to it, illuminates its shell a color (chosen from a predefined sequence) to give you, the proud parent of your Air Quality Egg, feedback that your Remote and Base Eggs are getting along.
Metamorphosis
The Base Egg then restructures the information it receives wirelessly into a format suitable for Cosm’s API. The Base Egg also decorates the datapoint with various tags to help applications search, filter, and group the data more efficiently. The Base Egg transmits the datapoint over the internet where it can live out the rest of its days as part of the world’s first open public Air Quality data set, and doing its part to give us a better understanding of air quality across time and space.
 Evolution
As the data set becomes larger and more dense, and as our understanding of the data grows, the hope is that our community will develop algorithms and procedures to improve the quality of the data through further post-processing. Techniques will also be hopefully be developed to help ‘calibrate’ your Egg’s sensors in a low cost, DIY way. As new sensors become available modules will be developed that will seamlessly plug into your existing Egg through the aforementioned Egg Bus connection, giving us an ever richer set of correlated data.
Posted: January 9th, 2013 | Author: admin | Filed under: AQE | Comments Off on Egg voted top 20 Kickstarters of 2012
The Air Quality Egg was voted one of the top 20 Kickstarters of 2012!
http://www.kickstarter.com/year/2012?utm_campaign=Jan082013&utm_medium=email&utm_source=newsletter#air_quality_egg
Posted: December 29th, 2012 | Author: admin | Filed under: Uncategorized | Comments Off on Kickstarter Eggs Shipping
It has been a long road, and we are very happy to say that we are shipping our first batch of Kickstarter Air Quality Eggs. We are shipping plain eggs first (that is, with no add on boards).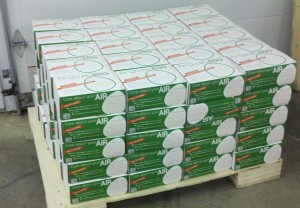
This is what 100 Eggs looks like. The address labels are on the side so that they don’t cover up the packaging. (If the one upside down package is driving you nuts, don’t worry, we turned it around 🙂
Once you get your egg, remember to go to airqualityegg.com and enter the serial number, which is printed on the inside of the box. Finally, we will be shipping more soon – if your egg is not in this batch, you will be getting it in a week or three.
Posted: December 13th, 2012 | Author: admin | Filed under: AQE, NewProduct | Comments Off on Egg Dust Sensor boards
We did the first tun of dust sensor breakout boards yesterday, so I snapped a pic of some with my phone camera: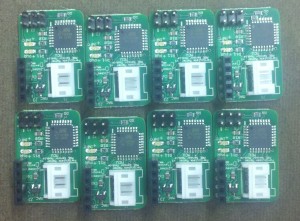 The white connector is for the bus cable which runs to the main Egg sensor shield. The dust sensor itself (not pictured) screws into the top side of the shell.
Posted: December 6th, 2012 | Author: Vic | Filed under: AQE, Nanode | Tags: Air Quality Egg, AQE, aqe sensor | Comments Off on Air Quality Egg Sensor Shield – HowTo
This one is for everyone who only got an Air Quality Egg Egg  Sensor Shield. I wanted to write it as a way of aggregating a bunch of information that is scattered across the interwebs presently. I’m also going to write it from the perspective of a Nanode as the host processor as that’s what I’m most familiar with and that’s what I wrote some code for. Here is the basic idea of how to get up and running quickly.
- Send us your MAC address (e.g. 00:04:a1:3c:11:22) from your Nanode to support AT wickeddevice DOT com (you know the drill). We need to register your device with Cosm to fold it into the Air Quality Egg network. If you run the sketch below and look at the serial data output, the MAC address gets printed out for your convenience.
- We will respond by email and let you know you’re hooked up on the back end.
- Download the software from Git Hub.
- Copy everything from the libraries folder to your arduino libraries folder.
- Load the AQEBaseSensor sketch onto your Nanode.
- Go to http://airqualityegg.com and type in your MAC address .
- Enjoy your data!
For people who got full-up Air Quality Eggs, we will have basically done everything up to step 6 for you (with different sketches). I’m completely swamped through December at least… it would be totally amazing if someone from the Air Quality Egg community could port this sketch to Arduino/Wiznet… I think it should be a relatively straightforward exercise.
Posted: December 2nd, 2012 | Author: Vic | Filed under: Uncategorized | Comments Off on Air Quality Egg: Gas Sensor Parameters
I thought I’d write a little bit about how the sensors are “mapped” to software for the technically interested. First some quick background. The NO2, CO, VOC, and Ozone sensors used in the Air Quality Egg have a lot in common. They are all CMOS sensors whose resistance varies in proportion to the amount concentration of gas present. The sensors’ operate based on surface chemistry, and the surfaces react selectively with a their target gas under prescribed surface temperatures. They differ in the following ways:
- Nominal resistance in clean air (R0)
- Response curve relating measured resistance to gas concentration (T)
- The range of resistance values over which the sensor varies (S)
- Required heater power (P)
- Maximum sensor voltage (Vs)
In the software that runs on the ATtiny88 on the Sensor Interface Shield and the Gas Sensor Add-on modules, these parameters are captured as follows:
- R0: The value is stored in EEPROM, associated with the variable array egg_bus_sensor_r0 (declared in eggbus.c)
- T: The table is stored in FLASH, Â associated with an assortment of variables that store the table in a compressed integer format (declared in interpolation.c)
- S: The span of resistances is accounted for by the R1, R2, R3 configurable scale voltage divider, which are associated with defined constants, e.g. NO2_SENSOR_R1 (declared in utility.h)
- P: The value is stored as a defined constant, e.g.NO2_HEATER_TARGET_POWER_MW (declared in main.h)
- Vs: The value is stored as a defined constant, e.g. NO2_VCC_TENTH_VOLTS (declared in utility.h)
The software that runs on the Sensor Interface Shield and the Gas Sensor Add-ons is very similar except for the definitions above. I tried to organize the software in a logical way. I ended up just copying the project files and renaming variables for clarity for each module. The software developer side of me cringes a little at this approach, that the sensor dependencies are a bit distributed throughout the code rather than collected into one source file somehow. But the rest of me says it works and that’s the important thing. Writing a blog entry about it is, in a sense, my way of reminding myself where these dependencies live. All part of the compromises of limited time and resources.
Posted: November 17th, 2012 | Author: Vic | Filed under: AQE, Uncategorized | Tags: AQE, sensor | Comments Off on Air Quality Egg: Setting R0 Values
Some people have been trying to update their fielded Egg Shields and running into trouble with really small values being reported (like 0). One reason this could happen is a mistake made here at the “factory” during programming. The sensors rely on a value stored per sensor called R0 – which is to say the nominal resistance of the sensor in ambient conditions. During device programming, we should have set these value to something reasonable. We set R0 for the NO2 sensors to 2200 (ohms) and R0 for the CO sensors to 750000 (ohms).
To do this procedure, you’ll need an FTDI cable or equivalent to program the device using the Arduino IDE. If you download the EggBus library from Git-Hub, it comes with a few useful examples. If you start by loading up the PollEggBus example (File => Examples => EggBus => PollEggBus”), it will show you, for each sensor it finds on the bus, a bunch of useful information. You’re going to want to look closely at what it says for “R0:” Â – and if it’s a “really big value” (like 4294967295, which turns out to be 0xffffffff to the binary initiated)Â we’ll have to run a quick sketch to get things back on track. Load up the PollEggBus_WriteTest example (File => Examples => EggBus => PollEggBus_WriteTest) and run it. After it runs you should see NO2’s R0 value is 2200 and CO’s R0 value is 750000 as advertised.
You can change these values to whatever you want actually, and I’m going to write up a derivative example that lets you perform a targeted calibration procedure in the near future.
Load back your Air Quality Egg sketch back onto your Nanode after you run this program (for standalone eggs this is probably the AQEBaseSensor sketch, and for Egg pairs it’s probable the AQERemote sketch). Hopefully this helps you out if it seems like your Egg is always outputting zero.
Posted: November 17th, 2012 | Author: admin | Filed under: AQE | Comments Off on Air Quality Egg Unboxing
In our last update, we talked about ordering the first article enclosures. Well, they have arrived! Here is an unboxing of the Air Quality Egg.
First, let’s take a look at the outside packaging. This is how it will arrive on your doorstep:
 [As always, click on images to biggify.]
As we were working on the packaging, we needed to know it could arrive in one piece. So we made a unit yesterday and played soccer with it around the shop, to test if it can survive the world’s mail services. (It did great).

The base station and remote (sensor) eggs, nestled in the foam! There is also an Ethernet cable and two power supplies. It will also ship with an instruction leaflet, which is not written yet. Let’s unpack:
 Here we can see the backs/undersides of the units. The base station has the network cable and power. The remote station has the network cable and fan. The fan will ensure a consistent airflow. Also, the base station will have a square hole – Albert, our erstwhile designer, will be uploading a 3D print to insert to close it. This is a function of saving costs by using the same enclosure for both the inside and outside units.
If you are just wanting to use them, you would now plug them in and head over to cosm.com. But let’s see what is inside:
 Here we can see the actual sensors on the remote station (Right) and the multicolor LED board on the base station (Left). The base station shield is designed for maximum hackability, and includes board space for a pushbutton switch and a capacitive sensing wire. You can use these to make the base responsive.
The enclosures are held together without screws, so it is easy to just twist-and-pull-and-pop them apart. It’s all in the wrist.
That completes the unboxing. We will have more to show you soon – things are at a very exciting point.
Posted: October 31st, 2012 | Author: admin | Filed under: AQE | Comments Off on Air Quality Egg enclosures update
If you have been following airqualityegg@googlegroups.com you probably know that enclosures are the gating factor in us getting the units out the door. Here is an update on the timeline:
I placed the enclosures order on Monday. It takes 3 weeks for the manufacturer to make the mold and send us a sample. This is used to check the mold is correct before we go and spend a bunch of money on something that does not work. Once that is done, we will be able to place the production order, which takes another 3 weeks. Then we’ll be able to ship units.
Again, I apologize for this delay. We’ll get them out the door as soon as we can.
Posted: October 31st, 2012 | Author: admin | Filed under: AQE | Comments Off on Making Shields
For anyone who enjoys watching machines do their thing as much as I do, here is a short video of the pick and place machine making Air Quality Egg shields.
Shield-PickandPlace from Wicked Device on Vimeo.
The large light colored rectangles are sockets to add additional sensors. The swish to the left is a nozzle change, so it can pick up the Attiny88 chip.


