Posted: October 24th, 2012 | Author: admin | Filed under: Uncategorized | Comments Off on Air Quality Egg: Shield only ship date
I am pleased to announce that people who ordered just the Air Quality Egg shield will have their orders start shipping on Tuesday.
We have the electronics for the whole basic egg, but don’t have the enclosures yet. We will be shipping the full eggs as soon as the enclosures are done.
Posted: October 23rd, 2012 | Author: admin | Filed under: AQE, Nanode | Comments Off on Egg shield and Arduino: MAC addresses
 The Air Quality Egg shield was developed using the Nanode Gateway. If you purchased an egg shield only, and want to use it with an Arduino there are a couple of things you need to know. The most important of these is that the Nanode has a hardware MAC address, but the Arduino ethernet / ethernet shield does not. Instead, you have to set it in software, which for many reasons is very error prone and not ideal for things that are in production. Here is a thread about it. In my opinion this makes the Nanode much more Internet-of-things friendly than than the Uno.
The MAC address is a globally unique identifier which uniquely identifies the network connector. Each network card / unit in your computer has one and you can’t have two of the same MAC addresses on the same network. For us the important part is that the software which connects to Cosm uses this MAC address as the provisioning ID. This means that if you want to use Cosm you need to make sure that it is (a) Unique and (b) Always the same.
Alternatively you can just buy a Nanode Gateway.
Posted: October 10th, 2012 | Author: admin | Filed under: Uncategorized | Comments Off on Air Quality Egg update
I think it is time for another AQE update.
Events: Today we will be at the New Green City Event at Union Square in Manhattan, thanks to the support of Albert and Joe (Yaay!). Booth will be on the southern steps of Union Square across from the Whole Foods, 10am until 5pm. That’s right now!
Production: Things are going well, with the usual bumps that we are getting over. The main issue at this point is the enclosure. It is the single most expensive part of the egg, and we need to make sure it is perfect before we send it off to the injection molding house.
It is also worth mentioning that your eggs are going to be completely made in the USA. Parts are from everywhere, but the manufacture, assembly, enclosures and production is all US based.
 Pic above is an AQE base station board in the pick and place machine. Astute viewers will notice that there is no paste on the board – because the machine is being taught the part locaions, not doing a production run.
Posted: October 5th, 2012 | Author: Vic | Filed under: Uncategorized | Comments Off on AVR Stack Overflow
No. I’m not talking about yet another stack exchange. I’m talking about an embedded programmers worst nightmare. Consider this fair warning, this post will provide a glimpse into one of the darkest recesses of nerd-dom, a topic that doesn’t really get talked about enough. Hopefully it will do its small part to spread awareness and provide relief to some troubled soul. I think this will be very interesting to some people.
When a program starts doing things that are completely inexplicable and random, very often the reason is what is known as stack overflow. I’ll give some background on “the problem,” then I’ll aggregate some useful information from around the web that can be helpful (with citations). I’m going to try and confine my discussion to the realm of embedded programming for microcontrollers, in particular in the context of avr-gcc (Arduino falls into this category). In order to do that, I will briefly describe the anatomy of an executable program (this is all fairly generalized). When your program is running, a whole bunch of stuff gets stored and manipulated in RAM (SRAM to be precise when it comes to AVRs). The Mega328 you find on most Arduino platforms these days has 2K bytes of SRAM as a point of reference. The “stuff” can be vaguely grouped into three categories:
This picture from the avr-gcc manual actually does good job of graphically depicting this memory model.
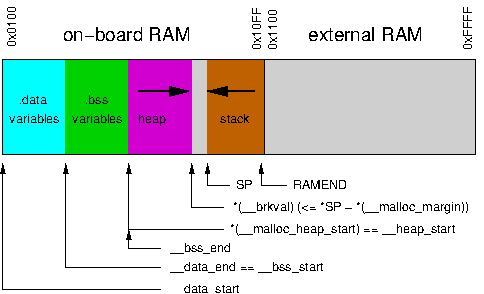
Basically the compiler takes all the global variables in your program and allocates them to RAM in the Global Data section (.data + .bss in the picture). That’s the easy part to get your head around. The Stack takes marginally more thought, and is a bit confusing to new programmers. In a nutshell its there to support function calls and interrupts. Whenever you call a function or take an interrupt, the stack is used to store away all the register state needed to restore execution to the callers context after the function or interrupt returns control. This includes things like the Status Register, the Program Counter, and other somewhat esoteric things that the compiler hides from you, and you’ve probably never heard of unless you’ve found yourself needing to write some assembly language to speed things up at some point. It also includes space for any local variables used by the called function. There is another register under the covers that keeps track of the address at the “head” of the stack, called the Stack Pointer. The stack pointer is typically initialized to the end of RAM and “grows” toward the beginning of RAM as functions get called and interrupts get taken (i.e. the Stack Pointer address becomes ‘lower’). Whenever functions return, the stack recedes back toward the end of RAM (i.e. the Stack Pointer address becomes ‘higher’). Compiler magic, basically.
Why does the Stack grow “down” from the end of RAM? The idea, in principle, is to accommodate the Heap, which is the place where dynamic memory allocation happens (in C++ the new keyword triggers this). The heap sits on top of your Global Data and grows toward the end of RAM (i.e. toward the Stack). If you’re not careful, your Heap and your Stack can trample all over each other and that is bad news. I won’t waste any more time talking about that though, since I have a firm belief that you should avoid dynamic memory allocation like the plague in embedded programming, it’s just not worth the headache and added complexity. So from here on, lets assume RAM only contains the Stack and Global Data.
That gives you the idea of the playing field. Now for the practical information (sorry it took so long!). Oftentimes with a big program, or an Arduino program that uses a number of libraries, users don’t have a firm grasp of how much global data they are allocating. While RAM is 2K bytes, we know from above that the amount of head-room the stack has for growth is actually 2K less the amount of Global Data that is allocated. If you declare some large buffers (as is commonly done with the EtherCard / EtherShield libraries) you really start to eat into that 2K. Call a couple of nested functions and before you know it, your stack has grown into the Global Data space. The result? All bets are off. Global variables could change their values in arbitrary ways not related to your programmed logic. In general, there is no way to recover once this happens, you are pretty much hosed.
So how do we handle this? The answer is unfortunately complicated. Since the depth of your stack depends on runtime execution of your program, it is generally not possible to predict its depth. You can be defensive by avoiding certain programming pitfalls. Do not use recursion in embedded programs, for a start – there’s always a way to write a recursive algorithm as an iterative algorithm. Try not to nest your function calls too deeply for another.
The best thing you can do though, is pay attention to what the tools tell you. There is a handy tool in the avr-gcc toolchain (binutils) called avr-size that can help a lot in understanding the amount of free RAM you have out of the gates.
There is a handy tool in the avr-gcc toolchain (binutils) called avr-size that can help with this. As described in this handy article you can run avr-size on an ELF file (a compiler build artifact, you can find where it is by enabling verbose output in Arduino IDE). It gives output like this:
avr-size /path/to/temporary_compile_dir/compiled.cpp.elf
text   data    bss    dec    hex                                                                                                    Â
17696Â Â 382Â Â Â Â 1366Â Â 19444 4bf4
Combine that with this little tidbit from the avr-gcc manual:
-
The avr-size program (part of binutils), coming from a Unix background, doesn’t account for the .data initialization space added to the .text section, so in order to know how much flash the final program will consume, one needs to add the values for both, .text and .data (but not .bss), while the amount of pre-allocated SRAM is the sum of .data and .bss.
In the example output above, that tells us that the amount of “pre-allocated” SRAM (i.e. global data) is 1366 + 382 = 1748 bytes. We have 2048 bytes (= 2K = 2 * 2^10) of RAM total, leaving us 2048 – 1748 = 300 bytes of space left for the Stack. If your data and bss add up to more than 2048 (or close to it even), your almost certain to experience stack overflow (say once your main program calls the setup() function in an Arduino program). It’s a shame that the Arduino IDE doesn’t report the static size information available from binutils avr-size command at the time of this writing. There’s an open issue for it, lets hope it gets in someday.
The next natural question is, how on earth do you know how deep your stack can get at runtime once your actual program flow starts happening. There are fancy programs out there that can try and figure that out based on static analysis of your program control graph, but that is an area of active research as far as I know. The “tried and true” method that I found on avr-freaks forums is to paint your RAM with a known value at startup then count bytes at runtime till you find the known value.
The gist of it is to add the following bunch of code to your program. The following is a bare bones Arduino sketch that you can use to “measure” the maximum depth of the Stack at any point in your program execution. It’s not a flawless method, but it is pretty good.
extern uint8_t _end;
extern uint8_t __stack;
#define STACK_CANARYÂ 0xc5
void StackPaint(void) __attribute__ ((naked)) __attribute__ ((section (".init1")));
void StackPaint(void)
{
#if 0
uint8_t *p = &_end;
while(p <= &__stack)
{
*p = STACK_CANARY;
p++;
}
#else
__asm volatile ("Â Â Â ldi r30,lo8(_end)\n"
"Â Â Â ldi r31,hi8(_end)\n"
"Â Â Â ldi r24,lo8(0xc5)\n" /* STACK_CANARY = 0xc5 */
"Â Â Â ldi r25,hi8(__stack)\n"
"Â Â Â rjmp .cmp\n"
".loop:\n"
"Â Â Â st Z+,r24\n"
".cmp:\n"
"Â Â Â cpi r30,lo8(__stack)\n"
"Â Â Â cpc r31,r25\n"
"Â Â Â brlo .loop\n"
"Â Â Â breq .loop"::);
#endif
}
uint16_t StackCount(void)
{
const uint8_t *p = &_end;
uint16_t      c = 0;
while(*p == STACK_CANARY && p <= &__stack)
{
p++;
c++;
}
return c;
}
#define PRINT_STACK_SPACE do{ \
Serial.print("Stack: "); \
Serial.println(StackCount()); \
} while(0)
void setup(){
Serial.begin(9600);
PRINT_STACK_SPACE;
}
void loop(){
}
When I run that sketch (in Ubuntu 12.04 with avr-gcc 4.5.3) I get 1811 of Stack space bytes remaining, which tells me that the Arduino 1.0.1 core takes up about 237 bytes of RAM out of the box (that’s about 11% of the total RAM), before you write hardly any lines of code. Keep that in mind when you’re building up your programs, and don’t forget that while you have 32K of FLASH memory in an Arduino, the 2K of SRAM is what you really need to keep an eye on. Hopefully you found this to be useful and not too long winded. If I got anything pretty much, but not exactly right, I’m totally playing the “I’m a hardware guy” card :-). Now go makes some LEDs blink over the Internet already.
Posted: September 29th, 2012 | Author: admin | Filed under: Uncategorized | Comments Off on New product: Nanode Gateway
 The new Nanode Gateway from Wicked Device provides a platform for the creative development of web connected devices, and with the use of low power RF, extends this connectivity well beyond the reach of normal WiFi devices.
Nanode Gateway uses low power 433MHz wireless to form a bidirectional link between the internet and remote sensors. Within the home and garden environment the Gateway has a range exceeding 300 feet. It can be purchased with or without a radio, which can easily be added later.
The Nanode Gateway allows you to connect sensor networks – for example environmental or weather sensors, to the internet for web based data logging and visualisation. The bidirectional wireless link allows the remote control of devices using relays or actuators providing the means for web controlled home automation.
Now it is possible to connect sensors all around your home and garden back to the internet, and control external devices using a web browser interface.
- Combines Ethernet and low power 433MHz wireless connectivity on an Arduino compatible platform.
- Provides a gateway for low power wireless devices to connect to the internet – with a range exceeding 300 feet.
- Wireless link allows monitoring and control of remote sensors and devices
- Open Source Hardware and Open Wireless Protocol used throughout.
- ATmega328 microcontroller programmed using Arduino IDE
- Supports up to 30 slave sensors or devices
- Low cost, and expandable using Arduino like shields
- Used in the Air Quality Egg and Open Energy Monitor Projects
- A building block of the Internet of Things
- Manufactured in the USA by Wicked Device.
Update: Here is a great blog post on how to use the Nanode as both a gateway and a wireless end point, to send data from the web, and out over wireless.
Posted: September 25th, 2012 | Author: admin | Filed under: Uncategorized | Comments Off on Why Air Quality Egg?
This is why:
Near-roadway air pollution a major contributor to L,A. asthma
Research conducted at the University of Southern California (USC) indicates that at least 8 percent of the more than 300,000 cases of childhood asthma in Los Angeles County can be attributed to traffic-related pollution at homes within 75 meters (a little less than 250 feet) of a busy roadway.
From here.
This is exactly the kind of micro climate “yards matter” air pollution that makes a big difference to our quality of life. We need to be able to measure and track it.
Posted: September 21st, 2012 | Author: admin | Filed under: Uncategorized | Comments Off on Air Quality Egg – Update
Things are cooking along on the egg project. We will be at Maker Faire next weekend with a demo unit – all the electronics, but a 3D printed enclosure, not the final one.
- The summary is we are really, really close.
- The package proofs are done. The air Quality Egg will ship in a 4″ x7″ x 10″ box. They look super cool and I can’t wait to show everyone the boxes when they are back from the printers in a couple of weeks.
- We have started making eggs! Yes, it is true, they are rolling off the line. We are not making the eggs one at a time, but rather all of the shields, then all of the base units, etc. The first unit we are making is the remote Nanode, and the first ones rolled off the the line today.
That’s it from Egg-land. See many of you at Maker Faire, and others online.
Posted: September 17th, 2012 | Author: admin | Filed under: Uncategorized | Tags: nanode | Comments Off on New Nanode Bootloader
A new version of Optiboot for the Nanode is available, and you can update your Nanode with an ISP programmer. It’s built from the latest and greatest optiboot source which fixes a couple of bugs and makes some important improvements.
- Supports the Watchdog Timer
- Blinks the Nanode LED (on D6) during upload
One usage change: when using the Arduino IDE, select “Uno” as the board, not “Duemilanove”.
All Optiboot programmed Nanodes sold by Wicked Device will be using this new version.
Posted: September 10th, 2012 | Author: admin | Filed under: Uncategorized | Comments Off on AQE Supplies arriving
 This is what 2,000 power supplies looks like. Each Egg will be shipping with two power supplies, one for the base station and one for the sensor unit*. These are really nice power supplies and deliver enough clean juice to power the boards and the sensor heating circuits.
In case you are curious about the mirrors in the background, our warehouse used to be a dog training facility.
* If you ordered the all in one base and sensor, you are of course just getting one power supply.


